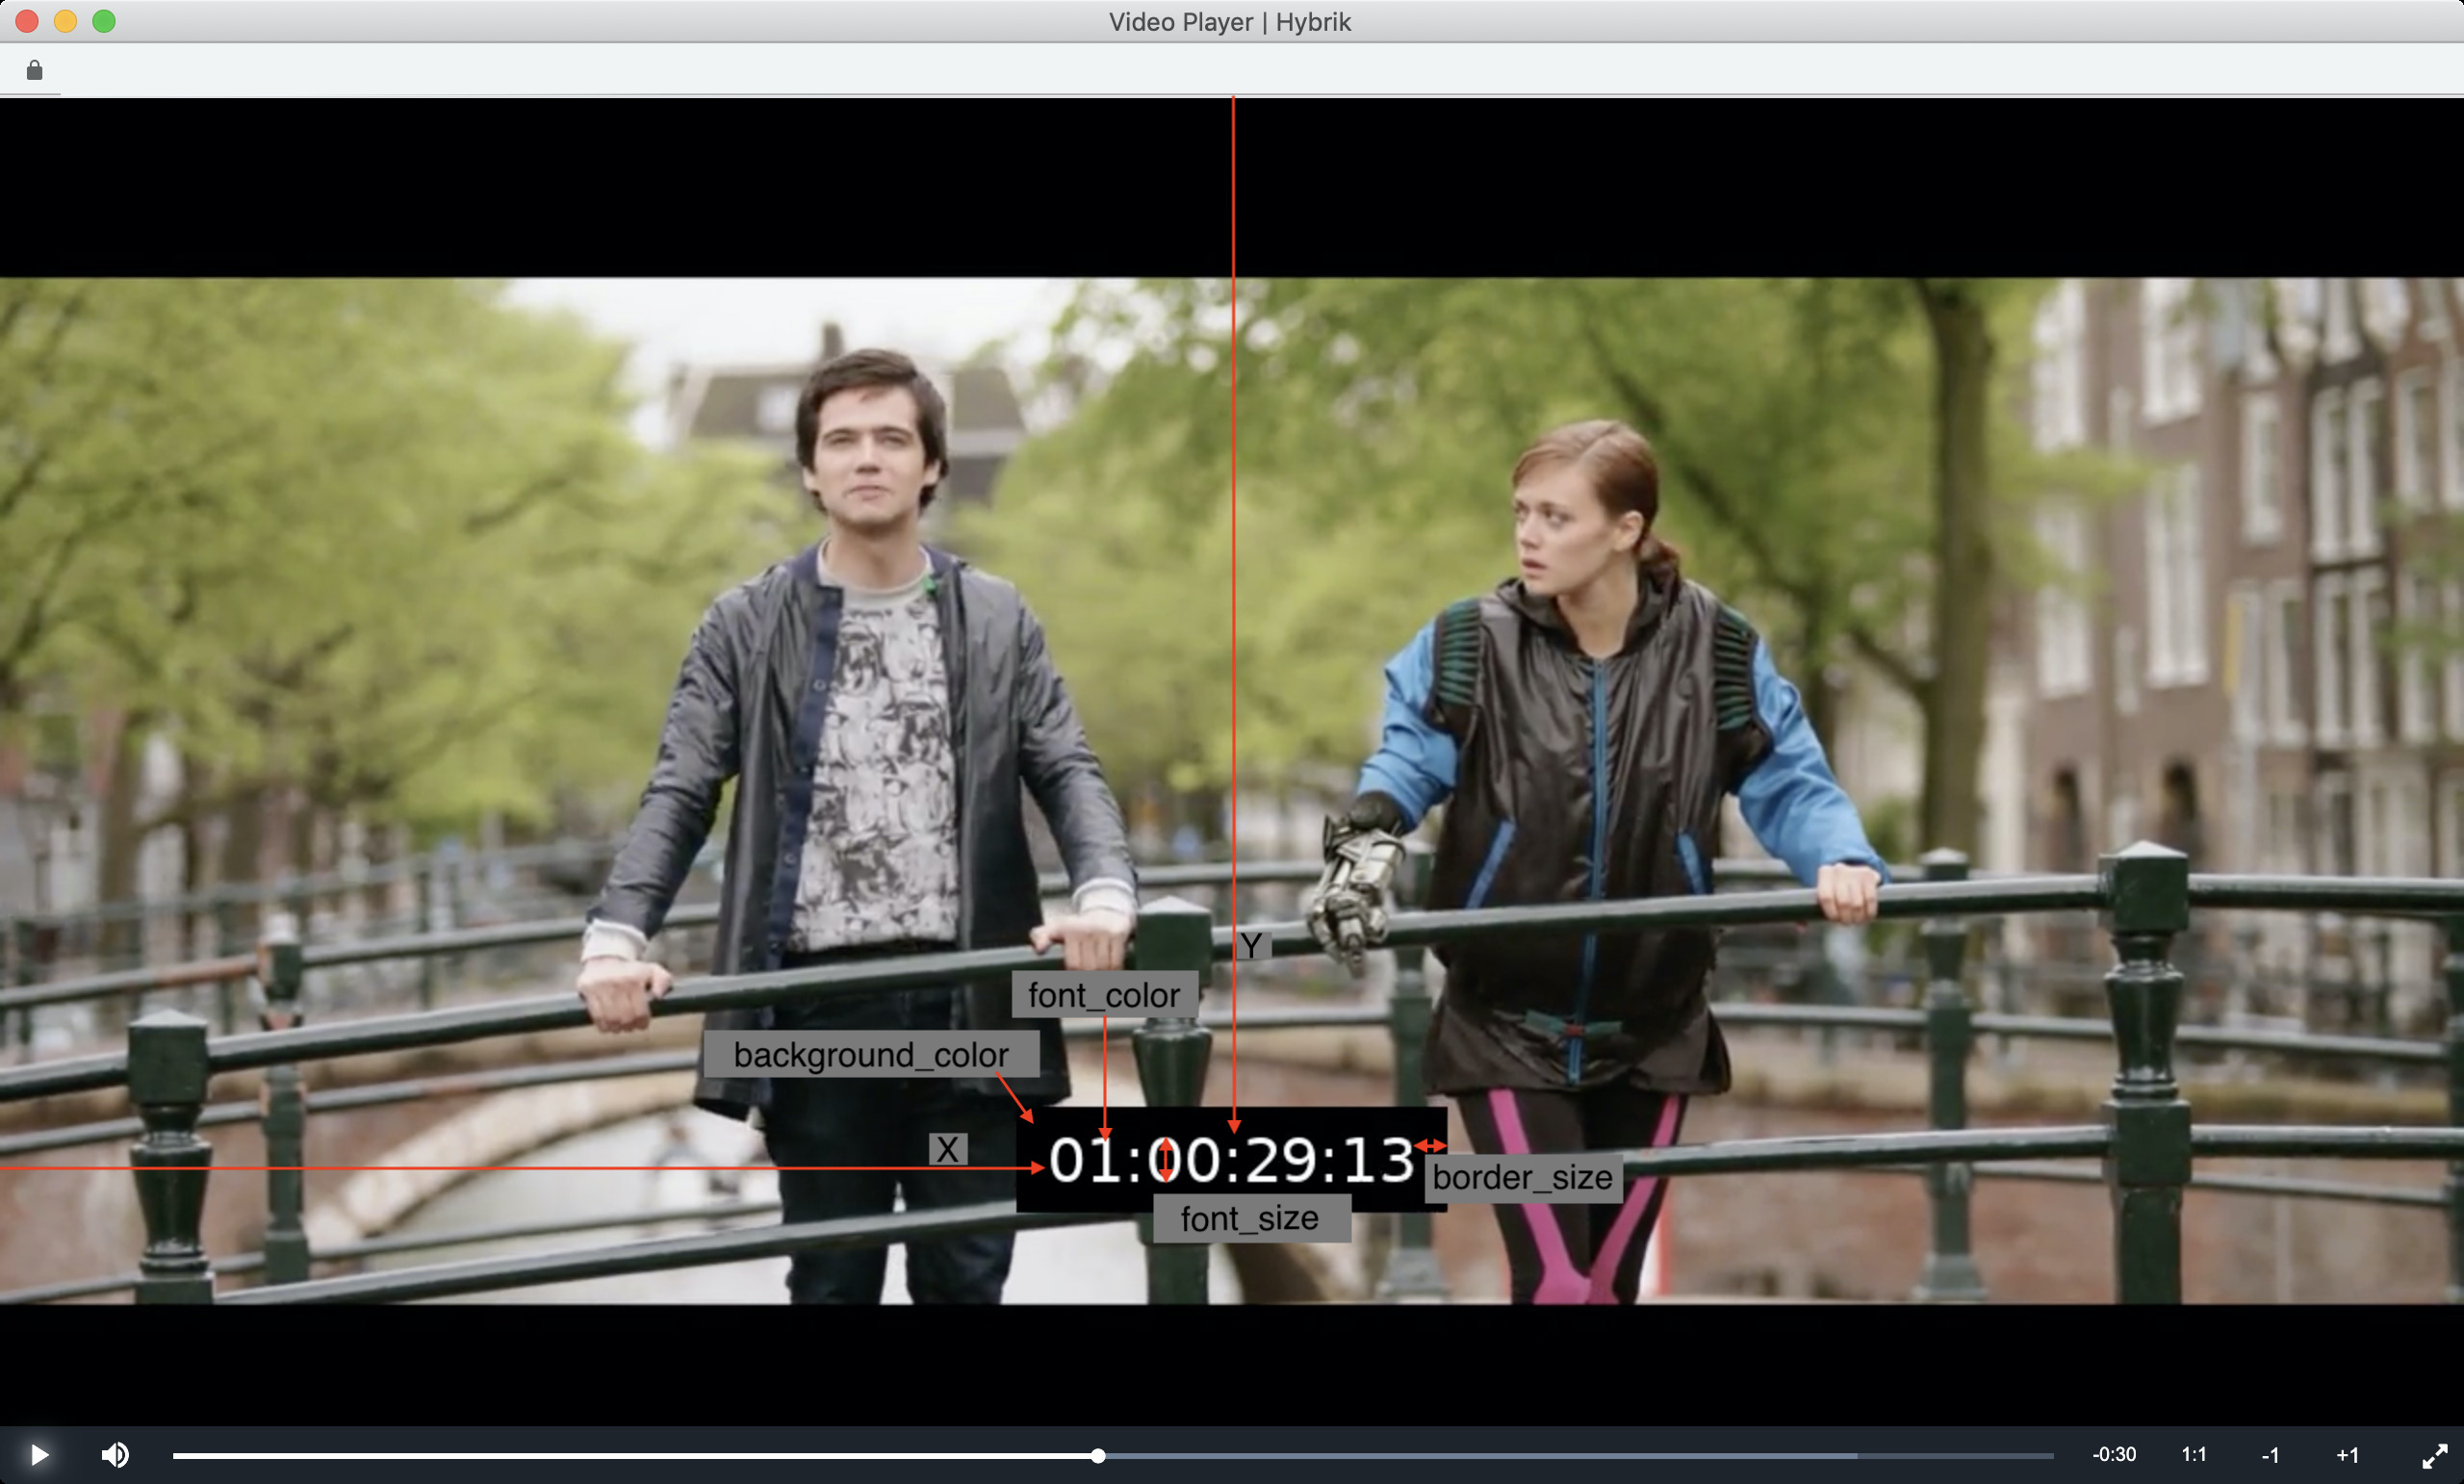
Print Timecode
Hybrik can print (or burn in) timecode into the video frame. The source for the timecode imprint can be a timecode track from a source file or custom generated.

print_timecode Video Filter
Printing timecode is enabled by adding a video filter to the target of a transcode task. The filter payload contains these common settings:
x- location on screen from the top left corner of the picture to the top left corner of the timecode
y- location on screen from the top of the screen to the top edge of the timecode
- You can use FFMPEG filter shorthand such as these:
- center print the text:
(w-text_w)/2(short for:picture width - text width / 2) - print the text on the bottom quarter:
(h/4)*3(short for:(picture height / 4) * 3)
- center print the text:
- You can use FFMPEG filter shorthand such as these:
- location on screen from the top of the screen to the top edge of the timecode
font_color(ie:whiteor hex codes like#FFFFFF)- color of the printed text
background_color(ie:black)- color of the box around the timecode
- you can use colors like
blackor hex codes like#30404f
border_size- how much margin there is around the timecode box in the background color
font_size- how tall the font is (ie:
20)
- how tall the font is (ie:
timecode_kind(more below)timecode_source(more below)timecode_start_value(ie:00:00:00;00for drop frame, or00:00:00:00for non-drop frame)- Read more from our API page about
print_timecode
Timecode Kind
timecode_kind allows you to select whether timecode is converted before being printed.
timecode_auto- Automatically sets the printed timecode between drop frame or non-drop frame to match the media source.
timecode_nodrop- Sets the printed timecode to non-drop frame timecode regardless of the media source.
timecode_drop- Sets the printed timecode to drop frame timecode regardless of the media source.
frame_nr- Prints the frame count.
media_time- Time derived by counting frames of the source media.
Timecode Source
You can choose between two timecode sources to print -- the media's embedded timecode or a custom start value.
media- Selects the source
mediatimecode as the imprint source.
- Selects the source
start_value- Set a different timecode start than the media.
Examples
Printing the embedded Timecode
Here is an example where we are printing the source media's timecode_kind automatically and using the actual timecode from the source. This means our printed timecode will be taken from the timecode embedded in our video and print drop frame or non-drop frame matching the media source.
"video": {
    "codec": "h264",
    "width": 720,
    "height": 480,
    "bitrate_kb": 6000,
    "profile": "baseline",
    "filters": [
        {
            "kind": "print_timecode",
            "payload": {
                "y": 100,
                "x": 100,
                "font": "sans",
                "font_color": "white",
                "background_color": "black",
                "font_size": 32,
                "timecode_kind": "timecode_auto",
                "timecode_source": "media"
            }
        }
    ]
},
The source media had a timecode start of 1 hour and we can see that printed (or burned in) here:

Starting at Zero
To print timecode that starts at zero and matches the source file's timecode type (non-drop frame), we can keep "timecode_kind": "timecode_auto", but change "timecode_source" to "start_value" and add a parameter for "timecode_start_value": "00:00:00:00" to override the media timecode.
It's important to note that the settings for "timecode_kind" and "timecode_start_value" that must respect each others value.
- If
"timecode_kind": "timecode_drop"is set- then
"timecode_start_value": "00:00:00;00"must have a semicolon between seconds and frames.
- then
- Else if
"timecode_kind": "timecode_nodrop"is set- then
"timecode_start_value": "00:00:00:00"must have a colon between seconds and frames. If this is not respected the job will fail on error.
- then
It is most convenient to leave timecode_kind set to timecode_auto to follow the source.
"filters": [
    {
        "kind": "print_timecode",
        "payload": {
            "y": 100,
            "x": 100,
            "font": "sans",
            "font_color": "white",
            "background_color": "black",
            "font_size": 32,
            "timecode_kind": "timecode_auto",
            "timecode_source": "start_value",
            "timecode_start_value": "00:00:00:00"
        }
    }
]
We can see in this example we choice to have overridden the 1 hour start value of the video and started with a value of 00:00:00:00.

Printing a Frame Count
To print a frame count based on the source media's timecode we can use "timecode_kind": "frame_nr" with "timecode_source": "media" as seen below.
"filters": [
    {
        "kind": "print_timecode",
        "payload": {
            "y": 100,
            "x": 100,
            "font": "sans",
            "font_color": "white",
            "background_color": "black",
            "font_size": 32,
            "timecode_kind": "frame_nr",
            "timecode_source": "media"
        }
    }
]
Here we see the result of printing the frame count. Note that since the media timecode had a start time of 01:00:00:00 our frame count started at 87071 (or frame_rate * 1 hour) and counted to the point we see in the screen grab below.

But if we wanted to print the frame count starting from zero at the head of the media that didn't have a zero start timecode. We could combine the "timecode_source": "start_value" and "timecode_kind": "frame_nr" together as seen in the example below.
"filters": [
	{
		"kind": "print_timecode",
		"payload": {
			"y": 10,
			"x": 255,
			"font": "sans",
			"font_color": "white",
			"background_color": "black",
			"font_size": 32,
			"timecode_kind": "frame_nr",
			"timecode_source": "start_value",
			"timecode_start_value": "00:00:00:00"
		}
	}
]
Here's an example from this job that forced a zero frame started and counted to the location we are displaying. Now the same frame is marked as frame number 671.
