Audio Normalization
If you need your production outputs to comply with a specification for audio loudness, you can apply a loudness normalization filter in a Hybrik job. This process will ensure that the loudness of the resulting outputs is set to the levels that you provide in the filter setup. Hybrik offers five methods of applying audio loudness normalization:
General Overview
For best results, you should use a dual-pass normalization process. With the exception "Dynamic Normalization", the normalization filters perform dual-pass loudness correction to ensure balanced audio loudness levels without any of the artifacts introduced by real-time correction processes. The first pass measures the audio level in an analyze Task, and the second pass in the transcode Task corrects it, thus fully retaining the content creator's intent and the original dynamics of the content. A typical job that uses 2-pass loudness normalization would include at least these three tasks:
- source
- analyze (to measure audio levels)
- transcode (to produce corrected audio content)
Dynamic Normalization is a faster single-pass normalization option that can be used, however the overall quality and consistency of the result is not as good as a dual-pass process.
Dolby Professional Loudness Correction
also known as DPLC for short
Correction Mode
There are two correction modes in the DPLC filter:
pcm_normalization- measuring the loudness, then scaling the PCM, and re-encoding with the proper dialnorm value. Your source does not need to be PCM audio.
metadata_update- measuring the loudness, then insertion of a new dialnorm-parameter value into a Dolby Digital or Dolby Digital Plus bitstream. See the "DPLC measure only and set dialnorm" Example at the bottom of this page.
- Note: Available only by using the preset
regulation_type"atsc_a85_agile".
DPLC Regulation Types
regulation_type provides a series of presets you an choose from:
atsc_a85_fixeddefaultatsc_a85_agileebu_r128freetv_op59arib_tr_b32manual
Preset DPLC Regulation Type
Choosing one of the presets will apply settings as shown in the table below.
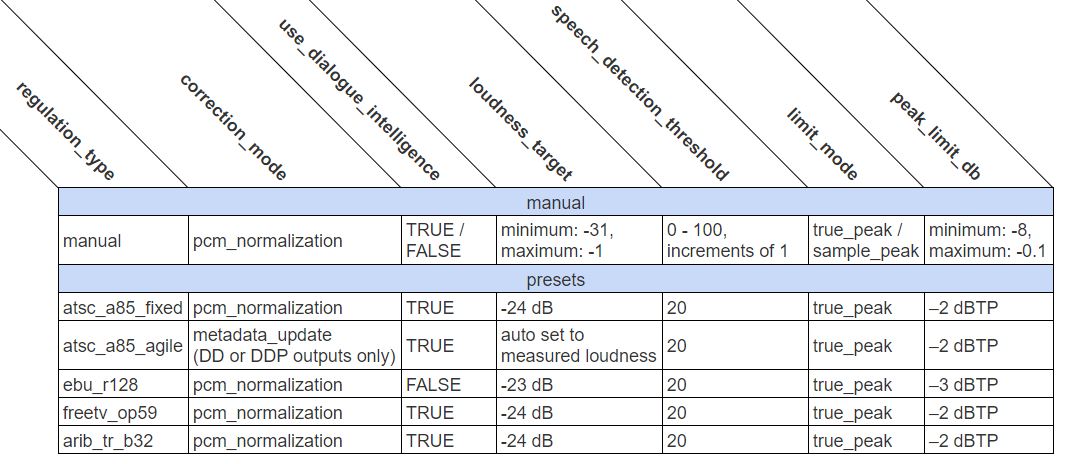
Manual DPLC Regulation Type Parameters
Choosing manual for the regulation_type allows you to enter custom values for the following settings:
correction_mode- must be
pcm_normalization
- must be
metering_mode1770-1,1770-2,1770-3, orLeqA- See Metering Mode
use_dialogue_intelligencetrueorfalse
loudness_target- Loudness target in LKFS between
-1and-31dB
- Loudness target in LKFS between
speech_detection_threshold- A number between
0and100
- A number between
limit_modetrue_peakorsample_peak
peak_limit_db- The peak value in
dBto use for loudness correction,-8to-0.1dBTP (in increments of0.1dBTP)
- The peak value in
Metering Mode
The Dolby Professional Loudness Correction filter combines the use of standards-based loudness estimation algorithms with Dolby Dialogue Intelligence technology. Supported algorithms are those most prominently in use worldwide: Leq(a), ITU-R BS. 1770-1, ITU-R BS. 1770-2, and ITU-R BS. 1770-3. These algorithms create a value that can be assigned as the loudness level of a program, using a combination of tools that include frequency-weighting curves to account for the human ear's particular sensitivity to audio in the middle of the hearing spectrum.
Our API document contains additional information about the available settings for the dplc filter:
DPLC Loudness Normalization - Manual Settings Example
The following example JSON snippet is for a source with one stereo audio track to be analyzed using manual settings, and then transcoded to an mp4 output with corrected stereo audio:
  "uid": "analyze_task",
  "kind": "analyze",
  "payload": {
    "general_properties": {
      "enabled": true
    },
    "deep_properties": {
      "audio": [
        {
          "dplc": {
            "enabled": true,
            "loudness_target": -16,
            "regulation_type": "manual",
            "limit_mode": "true_peak",
            "correction_mode": "pcm_normalization",
            "metering_mode": "1770-3",
            "peak_limit_db": -3
          }
        }
      ]
    }
  }
},
{
  "uid": "transcode_task",
  "kind": "transcode",
  "task": {
    "retry_method": "fail"
  },
  "payload": {
    "location": {
      "storage_provider": "s3",
      "path": "{{destination_path}}"
    },
    "targets": [
      {
        "file_pattern": "audio_corrected.mp4",
        "existing_files": "rename_new",
        "container": {
          "kind": "mp4"
        },
        "video": {
          "codec": "h264",
          "width": 640,
          "height": 360
        },
        "audio": [
          {
            "codec": "aac",
            "channels": 2,
            "sample_rate": 48000,
            "sample_size": 16,
            "filters": [
              {
                "kind": "normalize",
                "payload": {
                  "kind": "dplc"
                }
              }
            ]
          }
        ]
      }
    ]
  }
}
DPLC Loudness Normalization - Simple Preset Regulation Type Example
The following job snippet is just the analyze_task using the dplc ebu_r128 preset (you would also apply the DPLC Normalize filter in your transcode task as above):
{
  "uid": "analyze_task",
  "kind": "analyze",
  "payload": {
    "general_properties": {
      "enabled": true
    },
    "deep_properties": {
      "audio": [
        {
          "dplc": {
            "enabled": true,
            "regulation_type": "ebu_r128"
          }
        }
      ]
    }
  }
}
DPLC Loudness Normalization - A Complex Example
The following example job is set up to normalize two source audio tracks (a 6-channel track & a 2-channel track), resulting in an output with two corrected audio tracks. You'll notice that the analyze task contains two separate objects for dplc analysis; one for each source track, directed by the track_selector object. The results from these analyses are carried to the downstream transcode task for the transcoding engine to apply during audio processing.
  { {% raw %}
    "uid": "analyze_task",
    "kind": "analyze",
    "payload": {
      "general_properties": {
        "enabled": true
      },
      "deep_properties": {
        "audio": [
          {
            "track_selector": {
              "index": 0
            },
            "dplc": {
              "enabled": true,
              "loudness_target": -16,
              "regulation_type": "manual",
              "limit_mode": "true_peak",
              "correction_mode": "pcm_normalization",
              "metering_mode": "1770-3",
              "peak_limit_db": -3
            }
          },
          {
            "track_selector": {
              "index": 1
            },
            "dplc": {
              "enabled": true,
              "loudness_target": -16,
              "regulation_type": "manual",
              "limit_mode": "true_peak",
              "correction_mode": "pcm_normalization",
              "metering_mode": "1770-3",
              "peak_limit_db": -3
            }
          }
        ]
      }
    }
  },
  {
    "uid": "transcode_task",
    "kind": "transcode",
    "task": {
      "retry_method": "fail"
    },
    "payload": {
      "location": {
        "storage_provider": "s3",
        "path": "{{destination_path}}"
      },
      "targets": [
        {
          "file_pattern": "audio_corrected_6ch2ch.mp4",
          "existing_files": "rename_new",
          "container": {
            "kind": "mp4"
          },
          "video": {
            "codec": "h264",
            "width": 640,
            "height": 360
          },
          "audio": [
            {
              "codec": "aac",
              "channels": 6,
              "sample_rate": 48000,
              "sample_size": 16,
              "filters": [
                {
                  "kind": "normalize",
                  "payload": {
                    "kind": "dplc",
                    "payload": {
                      "analyzer_track_index": 0
                    }
                  }
                }
              ]
            },
            {
              "codec": "aac",
              "channels": 2,
              "sample_rate": 48000,
              "sample_size": 16,
              "filters": [
                {
                  "kind": "normalize",
                  "payload": {
                    "kind": "dplc",
                    "payload": {
                      "analyzer_track_index": 1
                    }
                  }
                }
              ]
            }
          ]
        }
      ]
    }
  }   {% endraw %}
In the example above, notice how each audio filter payload in the transcode task contains the analyzer_track_index setting. This is used to direct the appropriate data from the analysis results to each output track.
Peak Normalization
If you want to use Peak normalization, the source audio levels need to first be measured in an analyze task, and then defined in the transcode target audio filter:
Analyze Task Peak sample:
{
  "deep_properties": {
    "audio": {
      "levels": {
        "enabled": true
      }
    }
  }
}
Transcode Task Peak sample:
"filters": [
  {
    "kind": "normalize",
    "payload": {
      "kind": "peak",
      "payload": {
        "peak_level_db": -3
      }
    }
  }
]
RMS Normalization
If you want to use RMS normalization, the source audio levels need to first be measured in an analyze task, and then defined in the transcode target audio filter:
Analyze Task RMS sample:
{
  "deep_properties": {
    "audio": {
      "levels": {
        "enabled": true
      }
    }
  }
}
Transcode Task RMS sample:
"filters": [
  {
    "kind": "normalize",
    "payload": {
      "kind": "rms",
      "payload": {
        "rms_level_db": -10
      }
    }
  }
]
Dynamic Normalization
Dynamic Normalization is a single-pass normalization option that can be used, however the overall quality and consistency of the result is not as good as a dual-pass process.
Transcode Task Dynamic sample:
{
  "filters": [
    {
      "kind": "normalize",
      "payload": {
        "kind": "dynamic",
        "payload": {
          "peak_level_db": -3
        }
      }
    }
  ]
}
Example Jobs
Complete sample jobs for the examples above can be found below: