Getting Started
Welcome to Dolby Hybrik! Hybrik allows you to easily manage large-scale media processing operations in the cloud. Hybrik provides transcoding, media analysis, and quality control services running across a very large number of machines. All storage and computing takes place in your own VPC, resulting in the highest security and lowest cost. Hybrik runs on Amazon Web Services (AWS), Google Compute Platform (GCP), and Microsoft Azure. This tutorial will use the AWS for its examples, but the same instructions apply across three cloud environments. The differences will be in things like region naming, machine types, etc.
Cloud Credentials
To begin working with Hybrik, you will need a set of cloud credentials for the machines that will be launched in your account. Remember that Hybrik is launching machines in your cloud account, and so it needs permission to do so. It is good practice to use a new Hybrik-specific cloud user for Hybrik activity, rather than using your master credentials. Most customers create a cloud sub-account so that all Hybrik activity is sandboxed from your other cloud processing, and so that they can track expenses separately.
You will be entering your cloud credentials in your Hybrik Credentials Vault. For more information on the credentials setup, please see these tutorials:
Jobs and Tasks
All operations in Hybrik are defined by jobs. A job defines the source file(s) along with all of the associated operations that you wish to perform on that source. Each of these operations is known as a task. Available tasks include transcode, package, analyze, quality control, copy, and notify. Tasks may execute in parallel or in series, depending on the requirements of your workflow. For example, when creating an HLS output, it is possible to create all of the layers in parallel on different machines. In order to create the master HLS manifest, however, all the layers have to be completed first. Therefore a job specifies not only the tasks, but also the sequence of execution of the tasks.
All jobs within Hybrik are defined by a JSON (JavaScript Object Notation) file. JSON is an open-standard, human-readable mechanism for defining structured data. The Hybrik JSON file describes all of the tasks to be executed, as well as the specific order for each task. This includes error path operations. For example, the job may specify that a source file gets analyzed before transcoding to ensure that it meets the submission standards for size and data rate. If a source file fails, then it could trigger a series of additional tasks, such as copying the file to a new location and notifying the submitter that their file is incorrect. Please see the Hybrik JSON Tutorial for more information about the structure of Hybrik JSON.
Computing Groups
Your Hybrik account can be configured to support multiple Computing Groups. Each Computing Group specifies an Compute Region, a Machine Type, and a Launch Type. There are many reasons why you might want to configure multiple Computing Groups. For example, you might have one computing group in Europe to handle assets stored there, while having a different group in the US to transcode US-based assets. You always want to perform your transcoding in the same region that you are storing your data. If you have your data in one region and your processing in another, you will be charged by your cloud provider for moving the data between the regions.
Another reason you might want different Computing Groups is to have different types of machines performing different tasks. Each job can have user-specified tags that direct the job to a machine with a matching tag. For example, suppose that you have two types of jobs – one type that is a high-priority job and another type that doesn't have a deadline but needs to be done at the lowest possible price. You could set up two Computing Groups; one could be configured to launch very high performance machines whenever a high-priority job arrives, and another group could be configured with a fewer number of cheaper, lower-performance machines to limit costs. Large media operations will often be configured with multiple Computing Groups in order to precisely control the types, quantity, and cost of machines being launched.
Interface Overview
When you are given a Hybrik account, you will receive an email instructing you to set your password. Once you set your password, you will be able to log into the Hybrik interface.
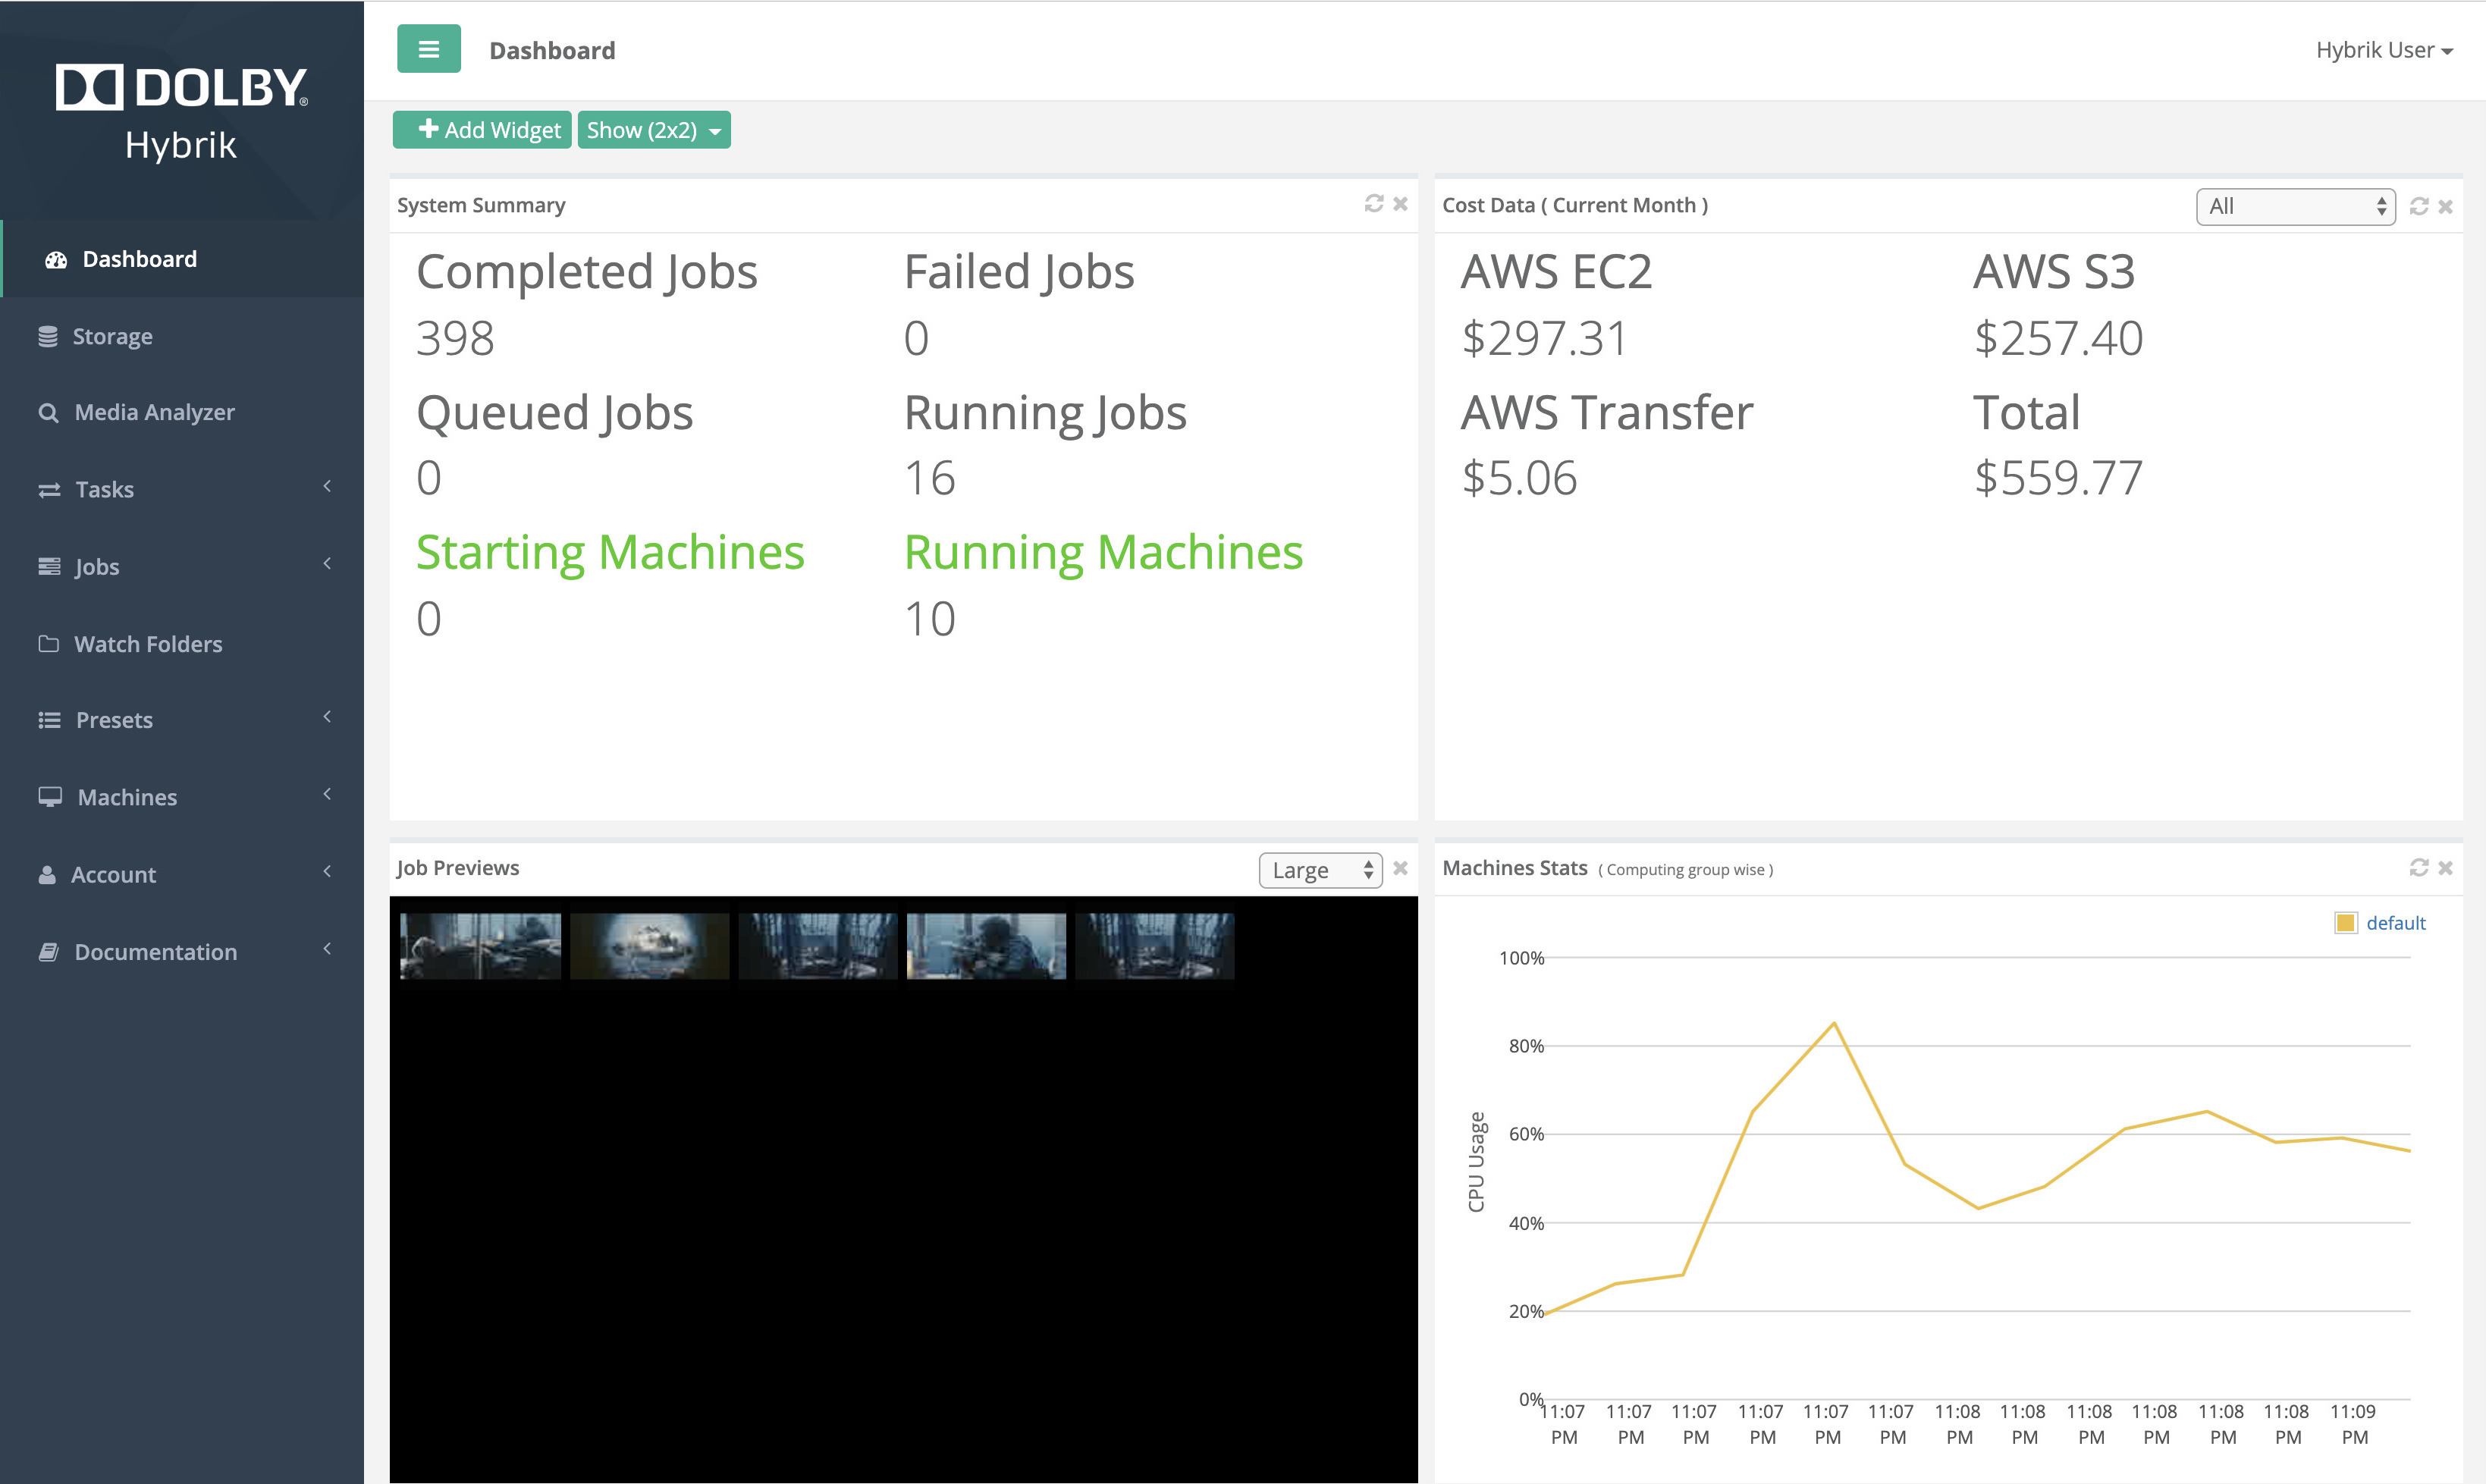
On the left side of the interface is a series of main menu items. Click on a main menu item to see the sub-items for that category:
- Dashboard: gives you an overview of all running jobs, machines, and costs
- Storage: browse your cloud storage, select files to preview, analyze, or transcode
- Jobs
- Create: create a Job by selecting a source file, template, and destination
- Edit: edit a Job JSON file
- Active Jobs: a list of all currently running Jobs
- Queued Jobs: a list of all Jobs that are currently waiting for a machine on which to execute
- Completed Jobs: a list of all Jobs that have completed successfully
- Failed Jobs: a list of all Jobs that have one or more failed Tasks
- Machines
- Activity: a list of all currently active machines in your Computing Groups
- Configuration: ehere you configure Computing Groups
- Account
- Info: information about your account, including API keys
- Users: manage sub-users and their permissions
- Notifications: create and manage SNS notifications for your jobs
- Credentials Vault: manage your cloud accounts, including credentials
Setting Up A New Computing Group
To set up a Computing Group, you'll need to add your cloud credentials for compute and storage to Hybrik. For more information on the credentials setup, please tutorials:
On the left side of the screen, select the menu item "Machines" and then the sub-menu item "Configuration". This will show you a list of all the current Computing Groups. If you haven't created one yet, this will be blank.
Select the "New Computing Group" button at the top of the page, then choose AWS, GCP, or Azure, depending on your cloud service platform. This will bring up a dialog that allows you to create a new Computing Group.
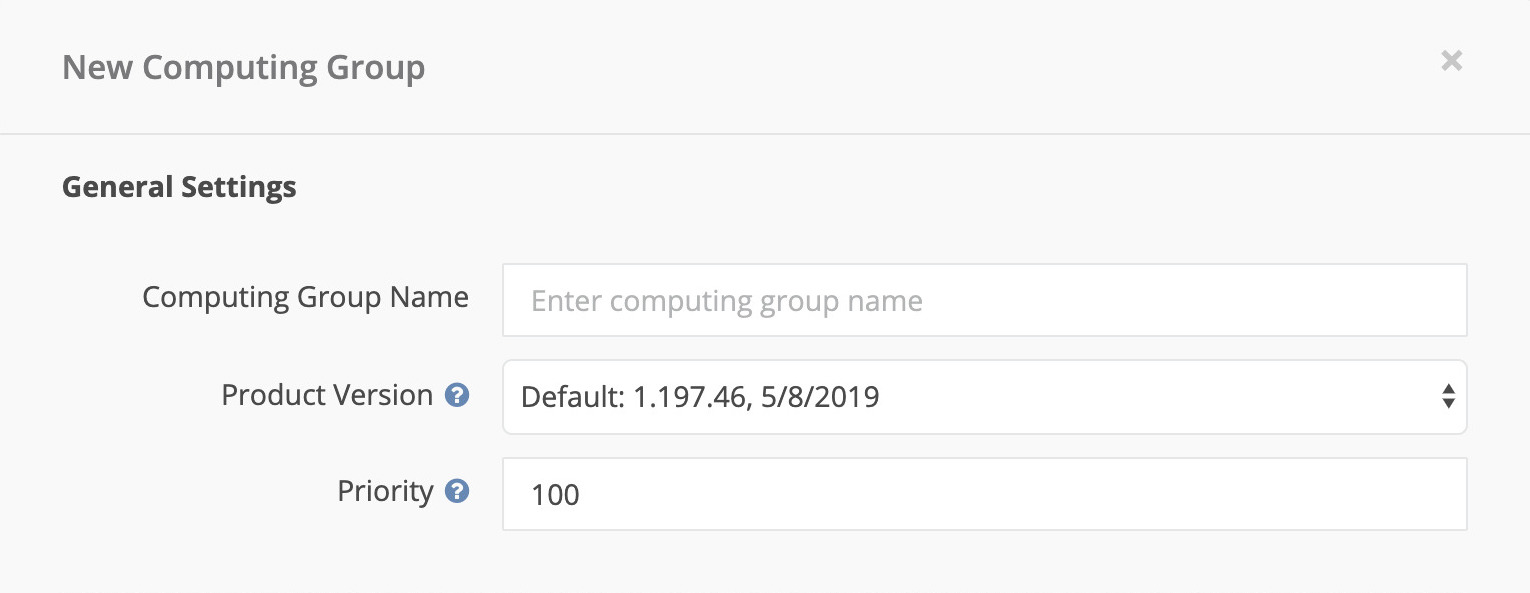
First, give this Computing Group a name. It can be anything you wish, but it is helpful to be descriptive for differentiating groups. For example, "US-East-1 Urgent" might be a good name. Next, choose the Product Version from the drop-down options. For now, choose the highest version, but not the "Always use latest..." option. The Product Version allows you to configure your Computing Group to use specific versions of the Hybrik product. This can be important when you have received approval for an output created by a specific product version, and you want to guarantee that changes made in later product versions will not apply to your outputs. Next, give a Priority to this Computing Group. Priority goes from 1 to 255, with 255 being the highest priority level. If there are two Computing Groups, the Computing Group with the higher priority will launch machines first. It's fine to use the default of 100.
Next you will need to add the credentials that you want to use with this computing group. Choose the "Add New Credentials" button. These credentials are encrypted and stored in your Credential Vault. The credentials are used to launch machines in your cloud account and to allow those machines to access your cloud data.
This will bring up a dialog to add a new set of credentials to your account.
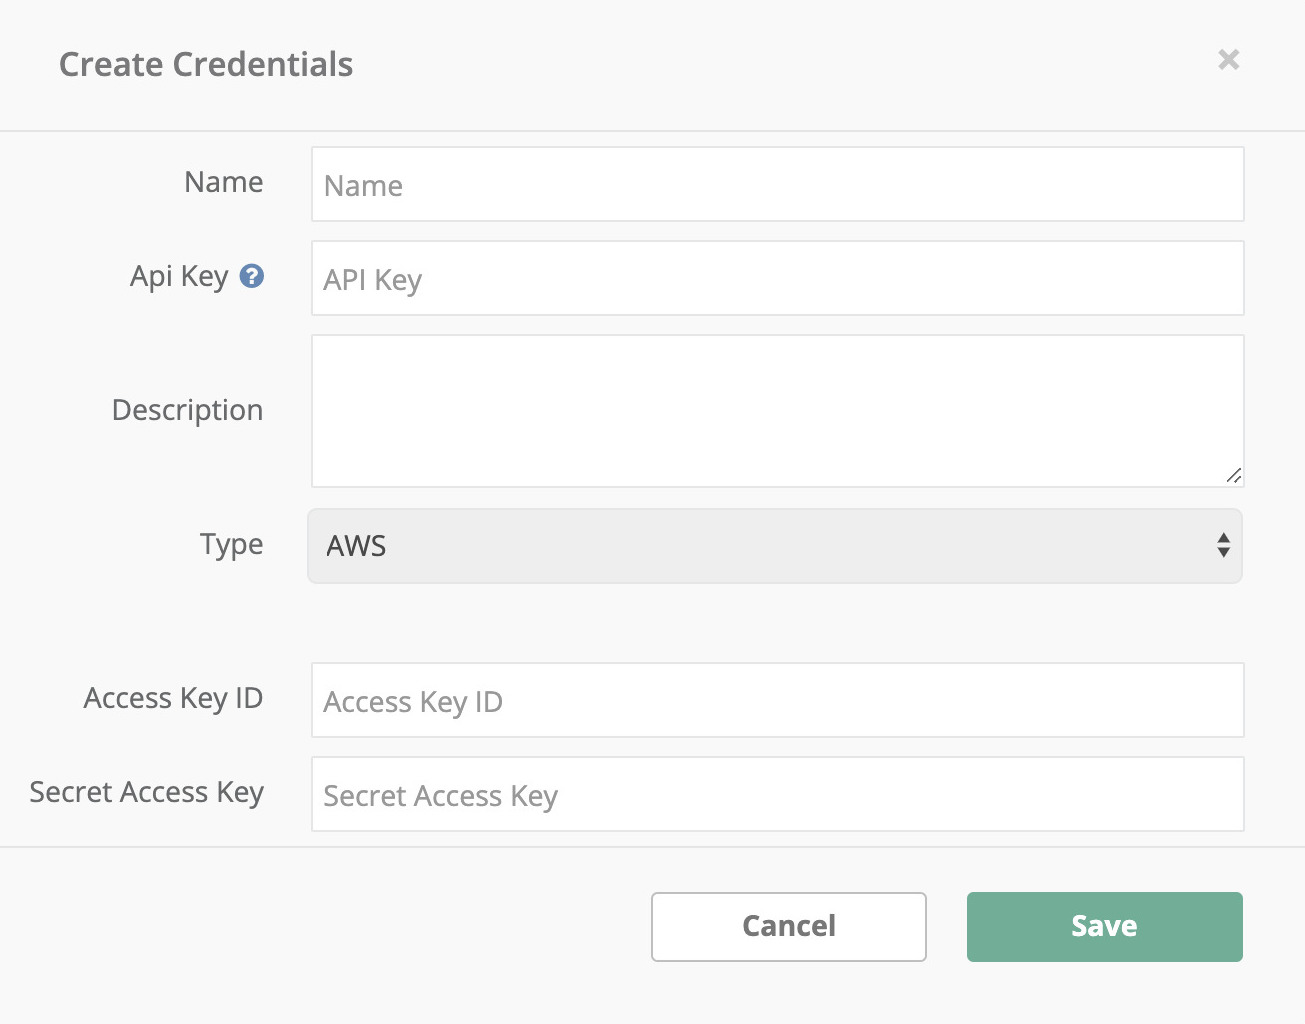
- Name: Give a name to the credentials. This is just to help you distinguish between sets of credentials. Example: "Dave's AWS Credentials for Hybrik"
- API Key: This is the name that can be referenced in API -based jobs that wish to use this credential set. Example: "dt_hybrik".
- Description: A short description of the credentials. (Optional)
- Type: The type of credentials used. Choices are:
- AWS
- Google Cloud Platform
- Google Storage Interop
- Azure Storage
- Cloudian S3
- SwiftStack
- Wasabi
- Username/Password
- Access Key ID: The public part of the access key pair
- Secret Access Key: The secret part of the access key pair
We'll use AWS for this tutorial. Click "Save" to complete the credential creation process.
In the next section you need to specify the type and location of the machines that will be launched as part of this computing group. First you will need to specify the Region where the machines for this group will be launched. The region you select should be the same one where your data is located. If you have source material in different regions, then you will want different computing groups for each region.
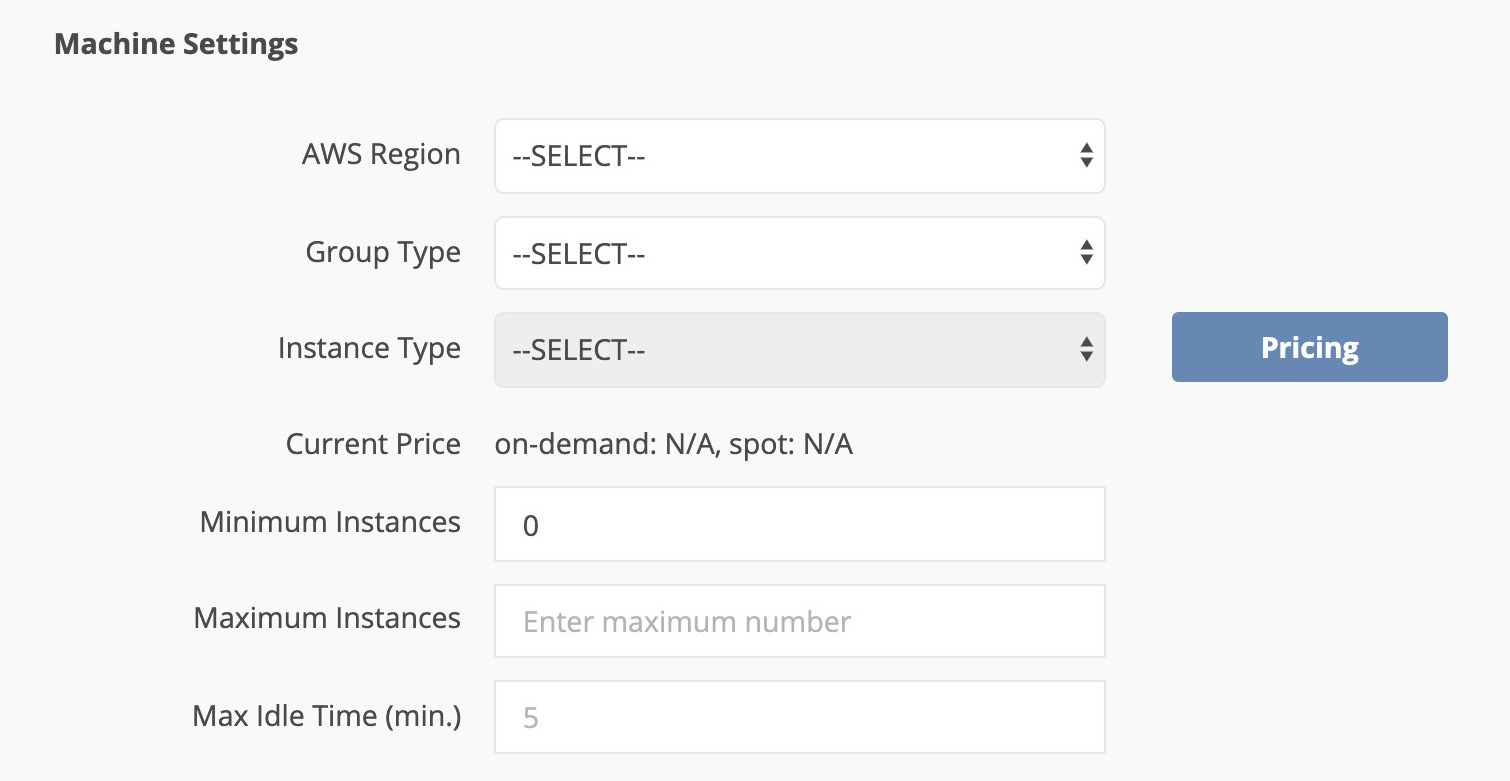
- AWS Region: The AWS Region where machines will be launched
- Group Type: The group type of machine that will be launched as part of this group
- On-Demand: These machines only launch when there are jobs to be run, and cost the "on-demand" price from AWS.
- On-Demand machines might be chosen for extremely long jobs (>6 hours), since there is always a risk of losing a Spot machine.
- Spot: These machines only launch when there are jobs to be run, but they will be bid for on the AWS Spot Market. Savings on the spot market can be over 80% compared to the On-Demand price. The majority of Hybrik customers do 100% of their processing on Spot machines in order to maximize their savings.
- Instance Type: The AWS EC2 instance type that will be used in this configuration
- Current Price: this shows you the comparitive cost of machine types
- Minimum Instances: If you set this to more than zero, then Hybrik will always keep that number of machines indefinitely, even if there are no jobs. This should only be used in scenarios where you need to guarantee instant processing availabilty without waiting for a machine to spin up.
- Maximum Instances: The maximum number of machines that this group will ever launch.
- Maximum Bid: If you are using Spot machines, you can specify the maximum amount that you are willing to bid for a machine.
- On-Demand Failover: Checking this box allows Hybrik to On-Demand machines if spot machines are unavailable. Hybrik recommends that you check this box whenever using Spot machines
- Max Idle Time (min.): This defines how long after finishing its tasks an instance should wait for new tasks before shutting down. The default is 5 minutes.
In the last section are Task Tags. It is optional whether you use Tags with your Computing Groups. The purpose of Tags is to allow the routing of specific jobs to specific machines. For example, you might want to route high-priority jobs to high-performance machines.

There are two types of Tags that you can specify for a Computing Group.
- Mandatory Tags: If you set a Mandatory Tag, then only tasks with that Tag will be executed in this Computing Group. For example, if you a set a Mandatory Tag of "super-urgent" for this Group, then only tasks with a matching "super-urgent" tag will be run on this Group of machines.
- Provided Tags: If you set a Provided Tag for this Computing Group, then this Group will execute any task that has a matching tag. In addition, this Computing Group will execute any non-tagged tasks. In other words, a Provided Tag says that a Computing Group is "available" to execute Tasks with that tag, but it can do other things as well.
- Select the Save button at the bottom of the dialog and you are ready to go!
Your First Transcode
Jobs in Hybrik are defined by JSON files. To get started, please download some of our sample JSON files and decompress the ZIP file. Next you can can submit the jobs to Hybrik from the web interface.
Go to the Jobs section, and you will see a Queued Jobs menu item. There are four different states that a job can be in:
- Active
- Queued
- Completed
- Failed
You can submit a new job from any of these locations. The actions that you can take on a particular screen will always be in top section above the list items. If a selection is greyed out, that means that you need to select a particular item (or items) in the list first. At the top left you will see a "Submit Job JSON" button. Choose this and then select the job JSON files that you downloaded.
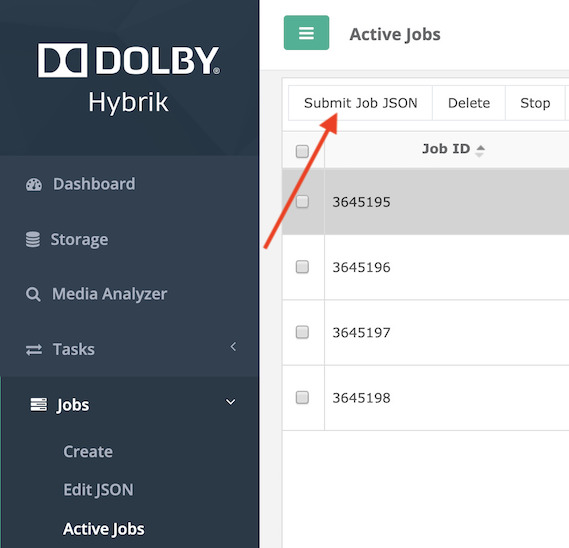
You will see your selections show up in the list of queued jobs. Once these jobs have been queued, Hybrik will launch machines in your cloud account to process the jobs.
Go to the Machine Activity page to see machines being launched in your account. It can take a few minutes for the machines to be acquired and then have the Hybrik software loaded and begin processing. When you move to a production environment, you will make decisions on the amount of latency that is acceptable for your processing. You may choose to have some machines running constantly, or only have them launch as needed.
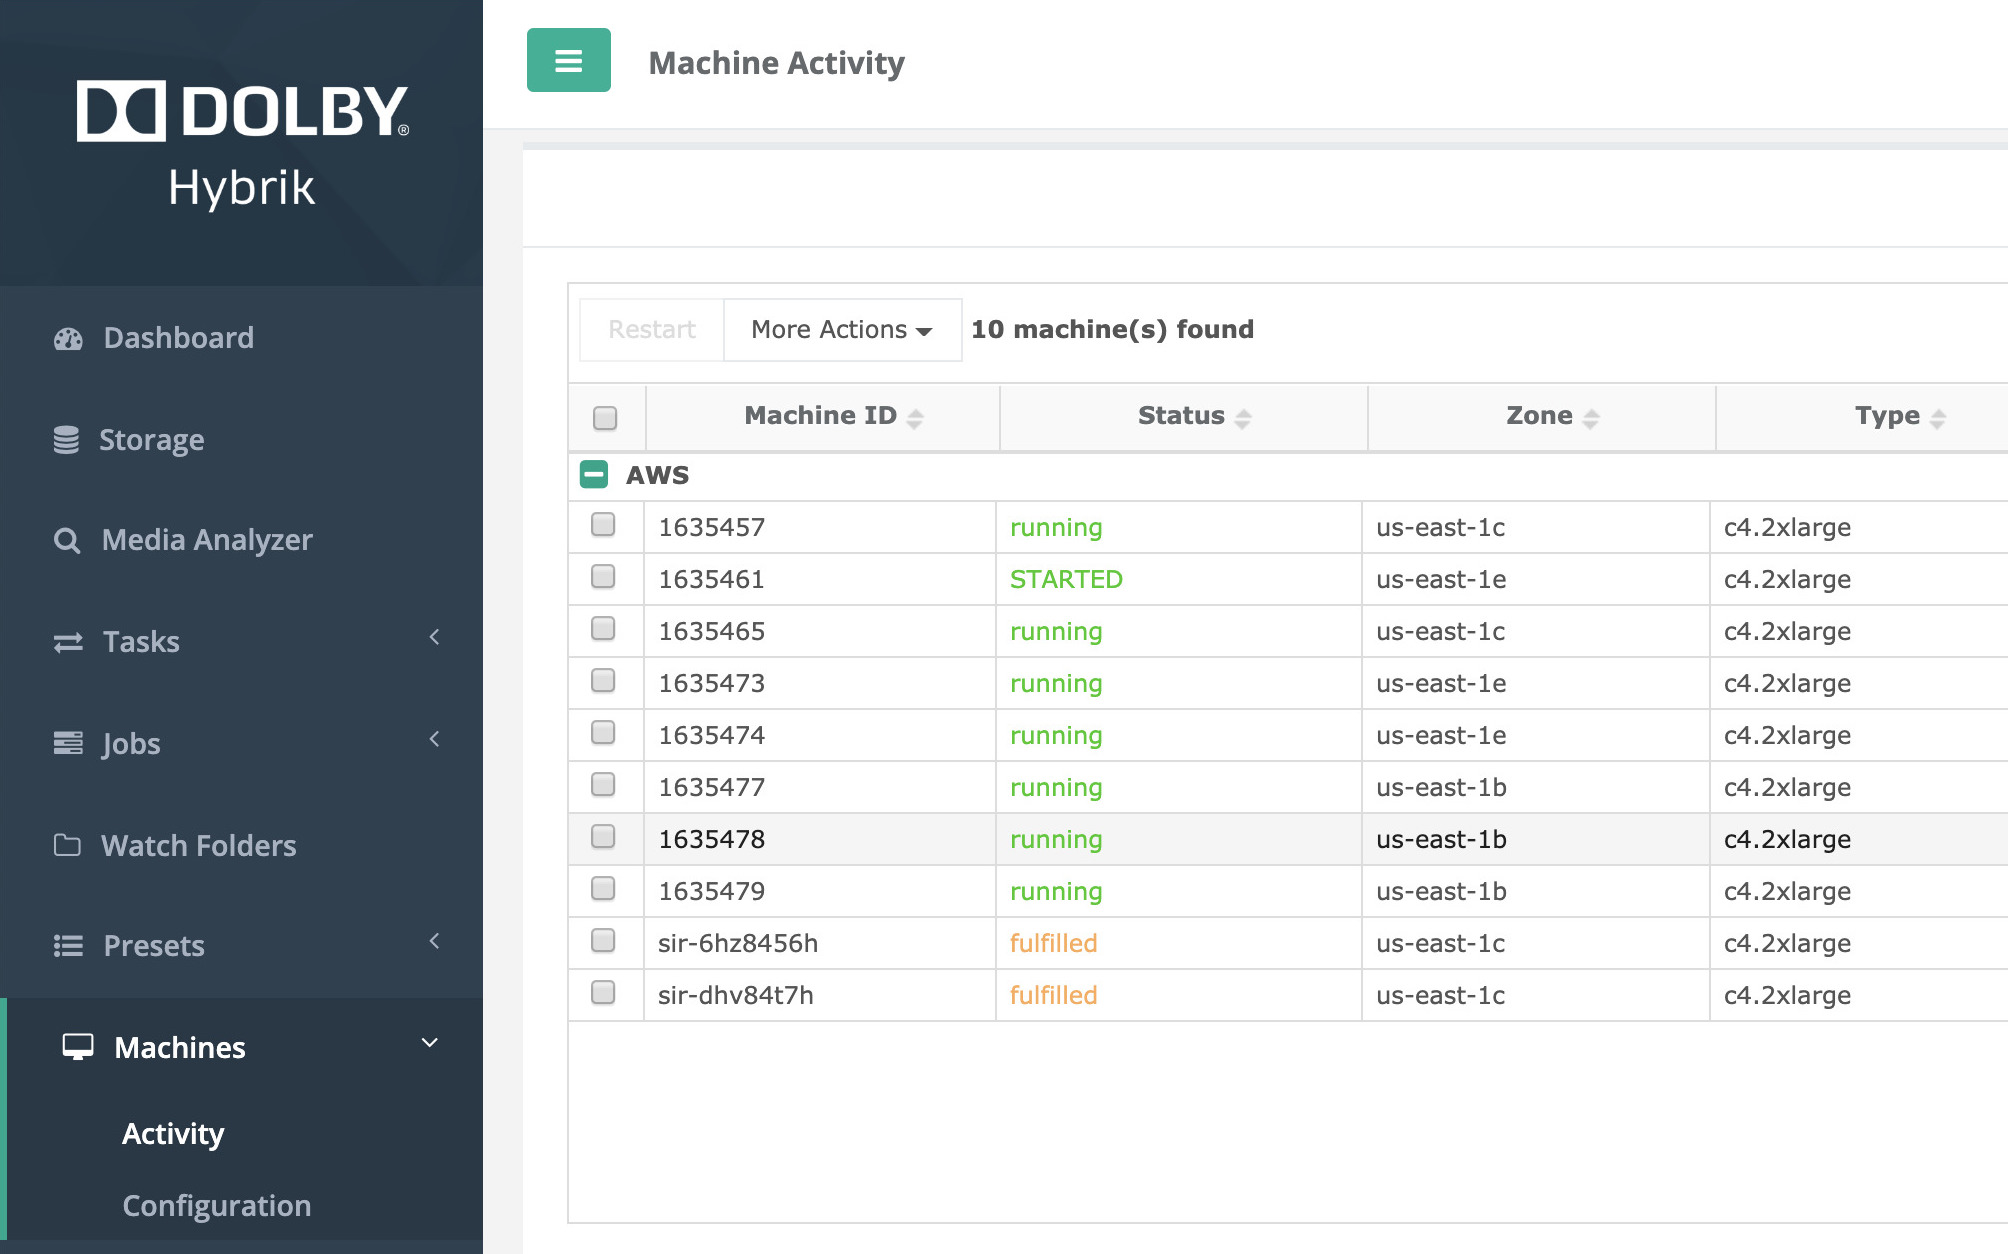
As machines start to run, the jobs will move from the queued state to the active state. Check the Active Jobs page to see the jobs as they are running.

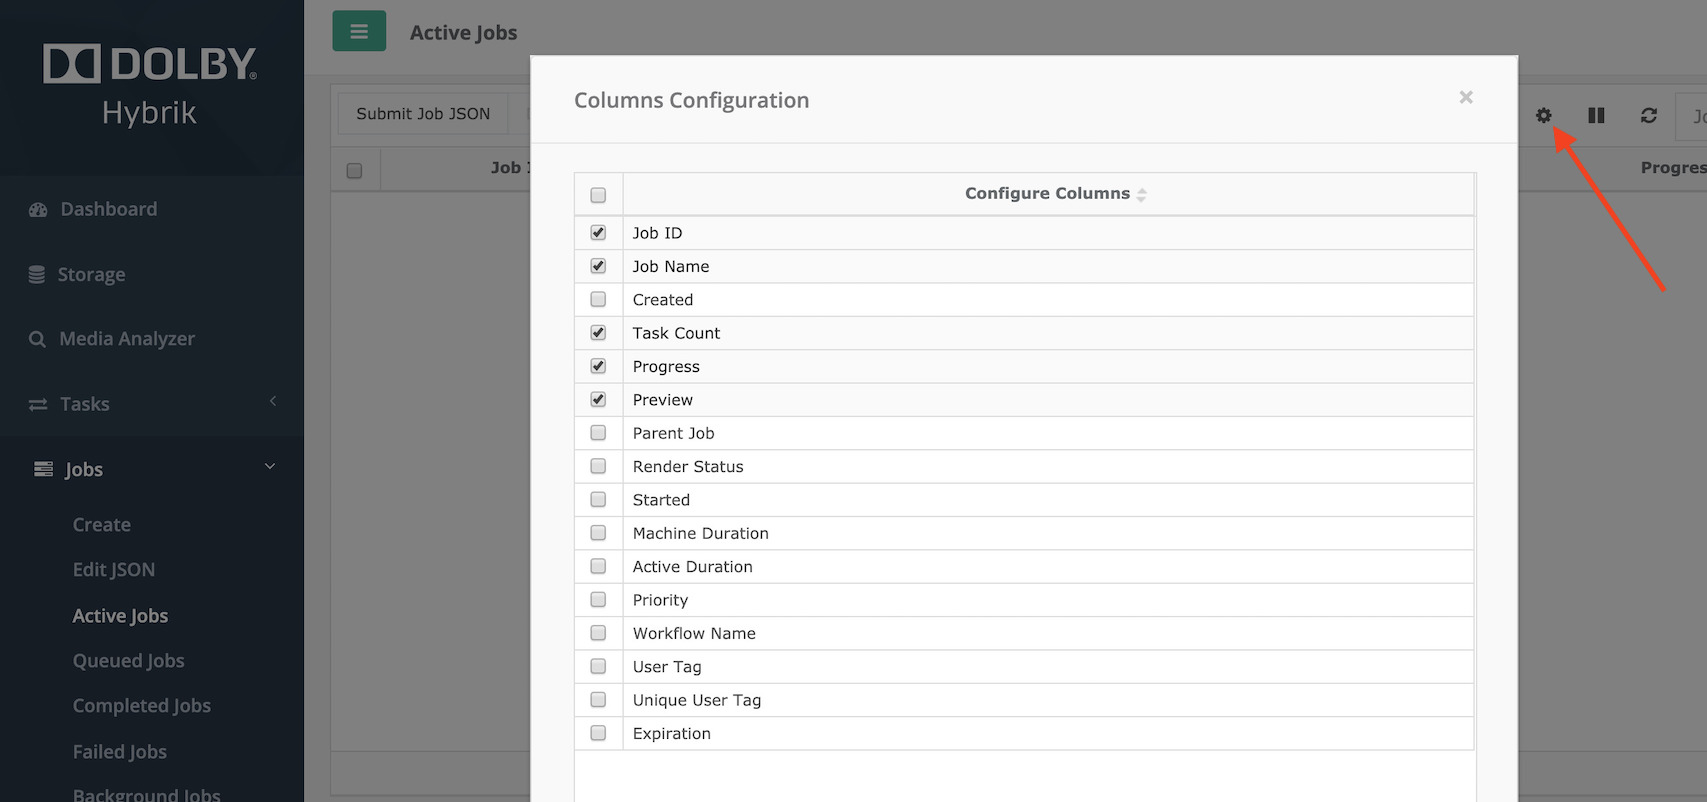
On the upper right of the screen, you will see several icons. If you hover your mouse over the icons they will tell you their operation. The gear icon will allow you to change the columns of data that are displayed in each window.
The details icon will show (or hide) a details view at the bottom of the page. Selecting a job in the upper window will then show you the details of that job in the lower pane.
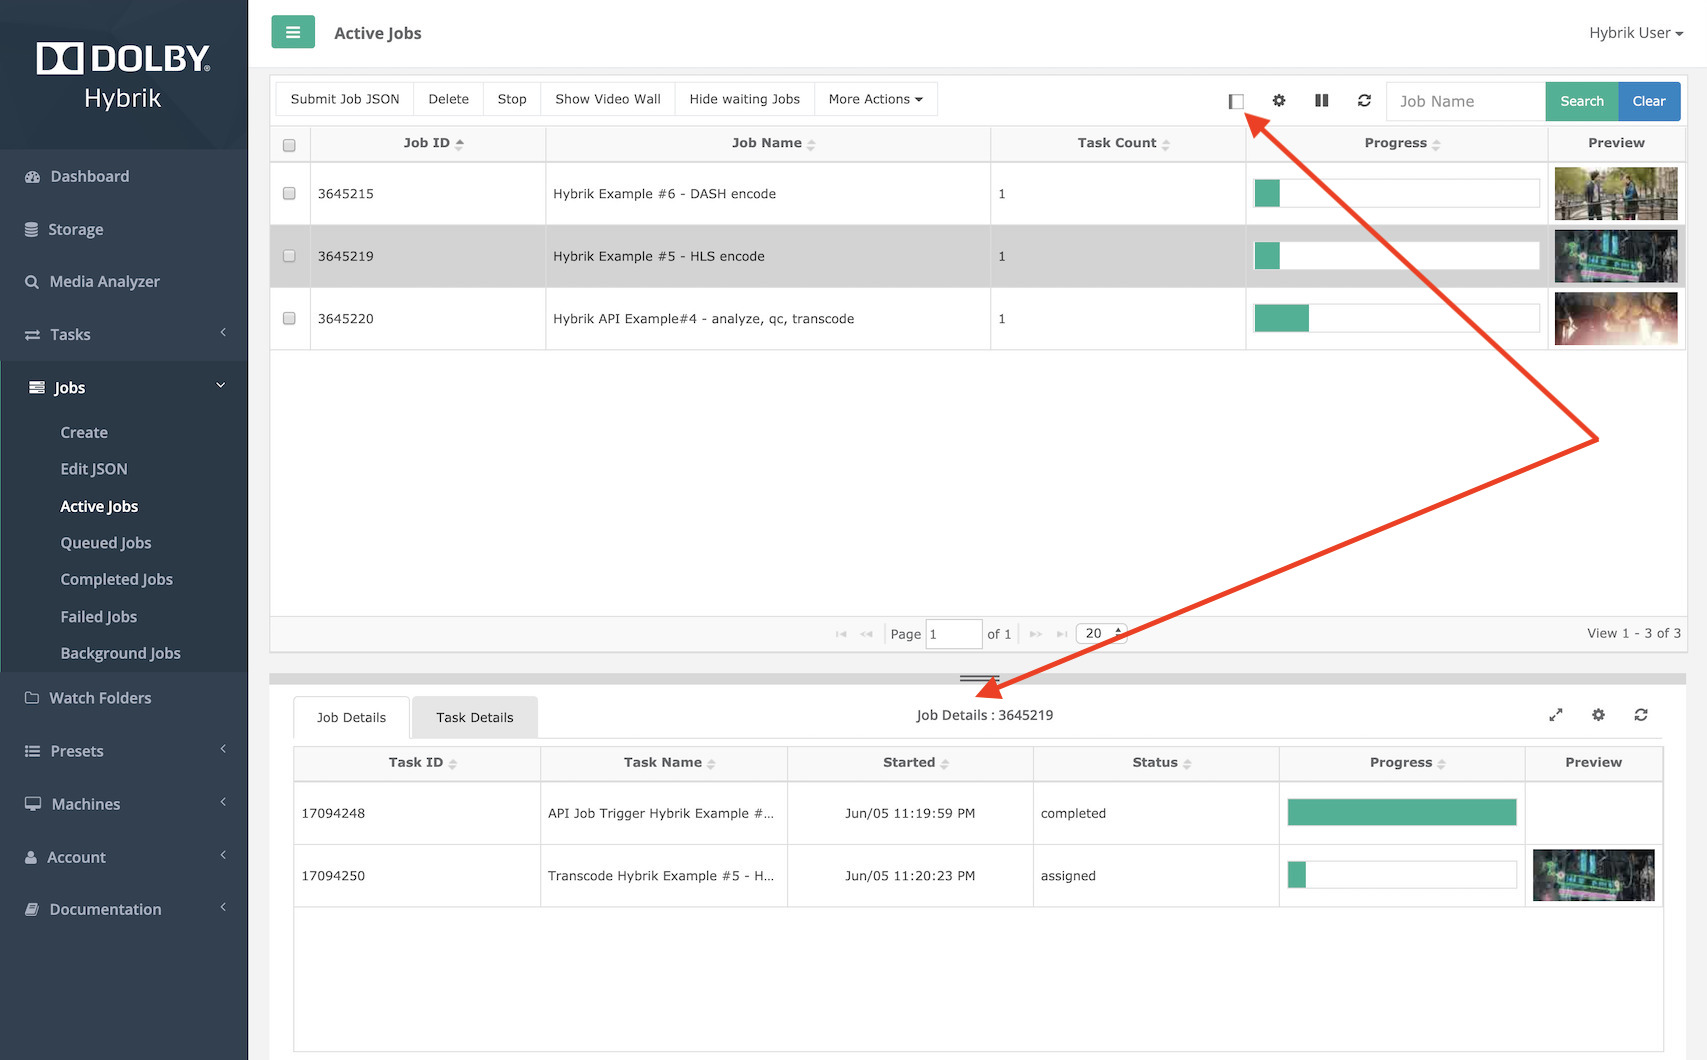
Congratulations, you have completed your first transcodes! Once the jobs have finished, they will show up in the Completed Jobs section.
Creating Your Own Job
Your next step will be to create a job using your own assets. First, make sure that you have some video files in a cloud bucket. Then follow these steps to create your own transcode.
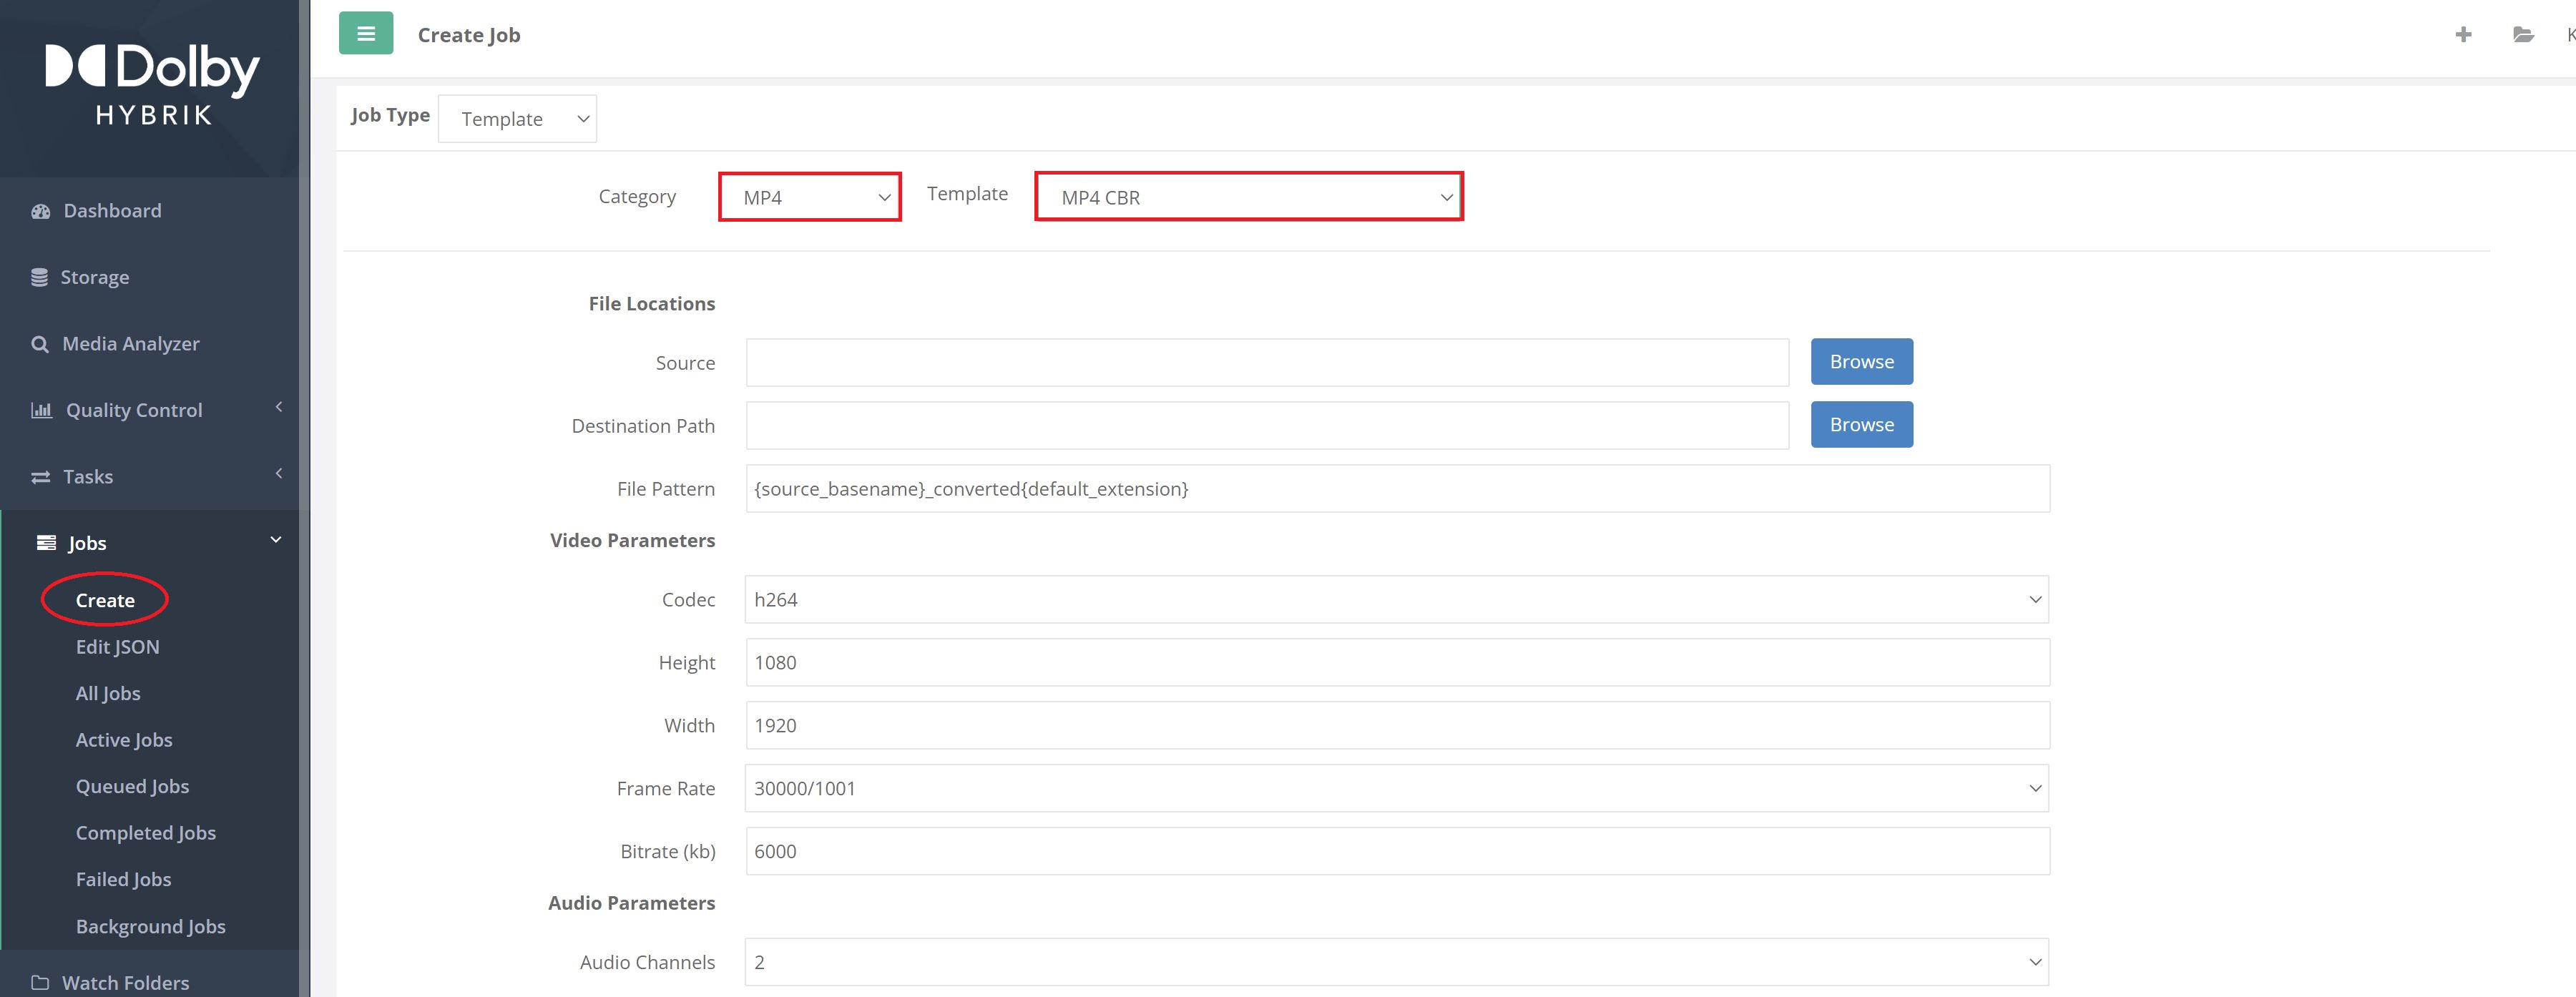
Go to the Jobs menu and select Create. This will bring you to the Create Job page. Choose a Template Category, then choose one of the MP4 Template options.
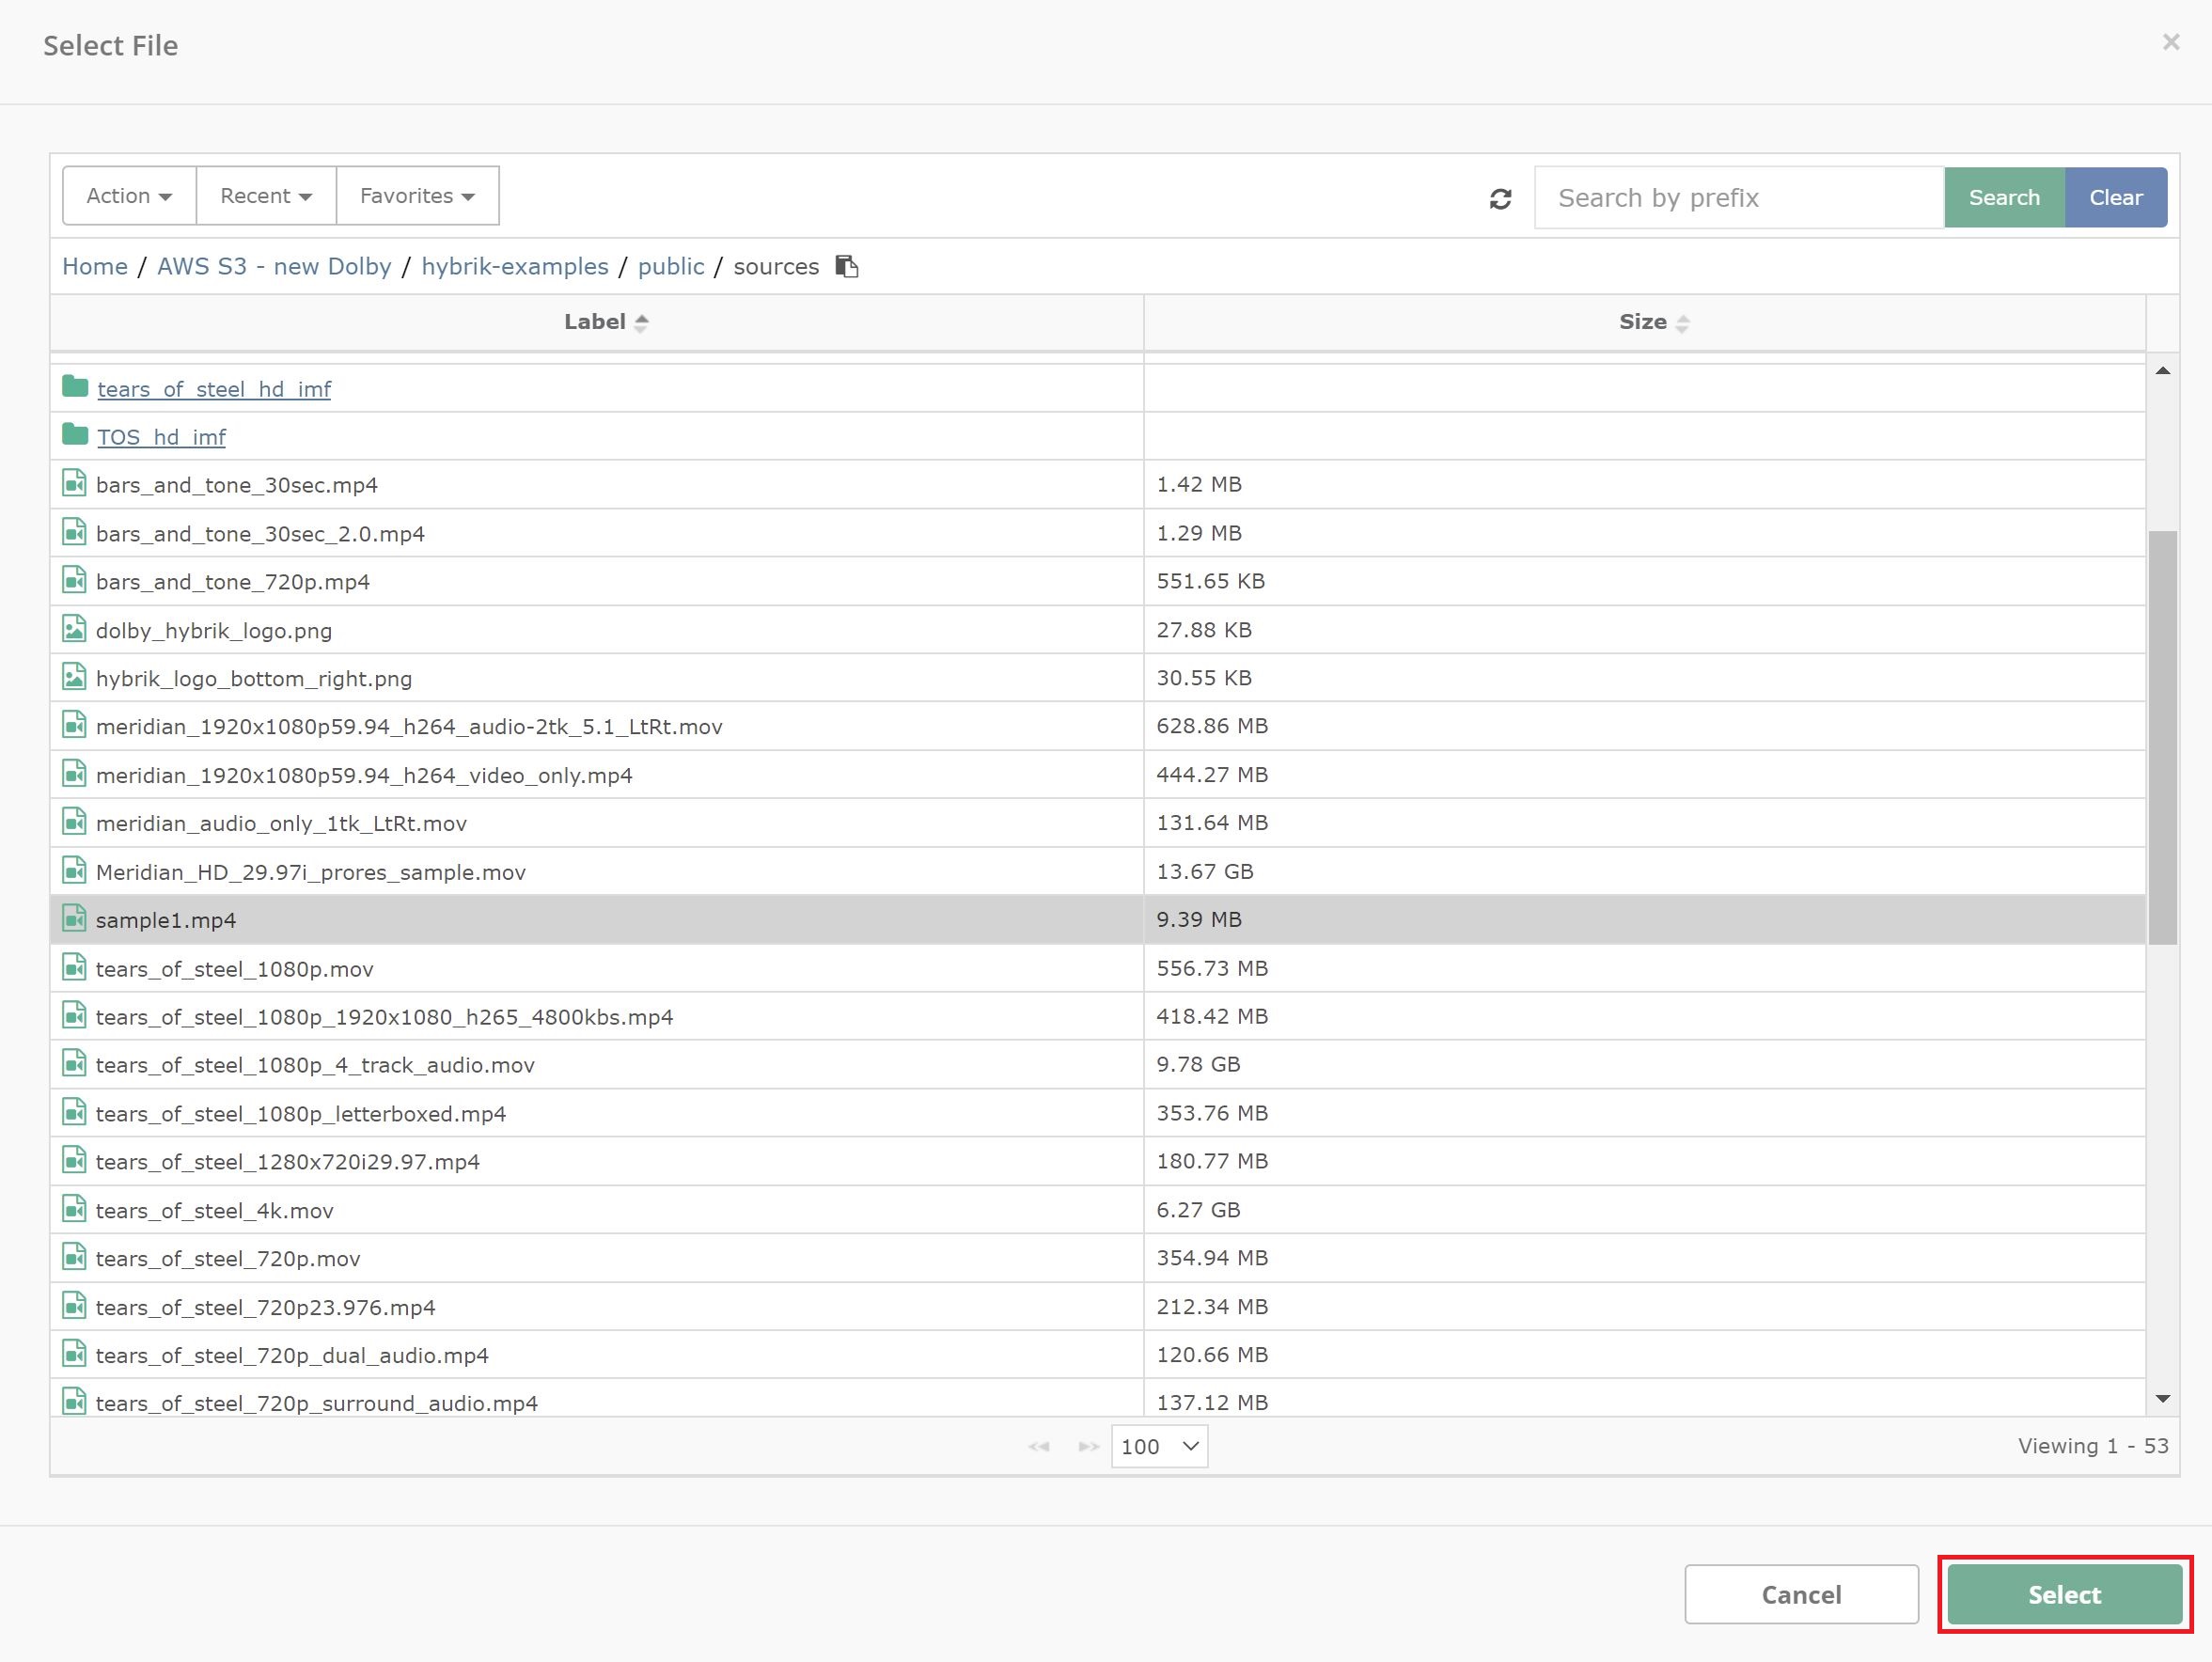
Next, you will select the source file that you would like to process. Under File Locations, and to the right of the Source field is a Browse button. Click this to display a browser that allows you to see the contents of your storage. Navigate to the file you would like to transcode, select it and click the Select button at the bottom of the dialog.
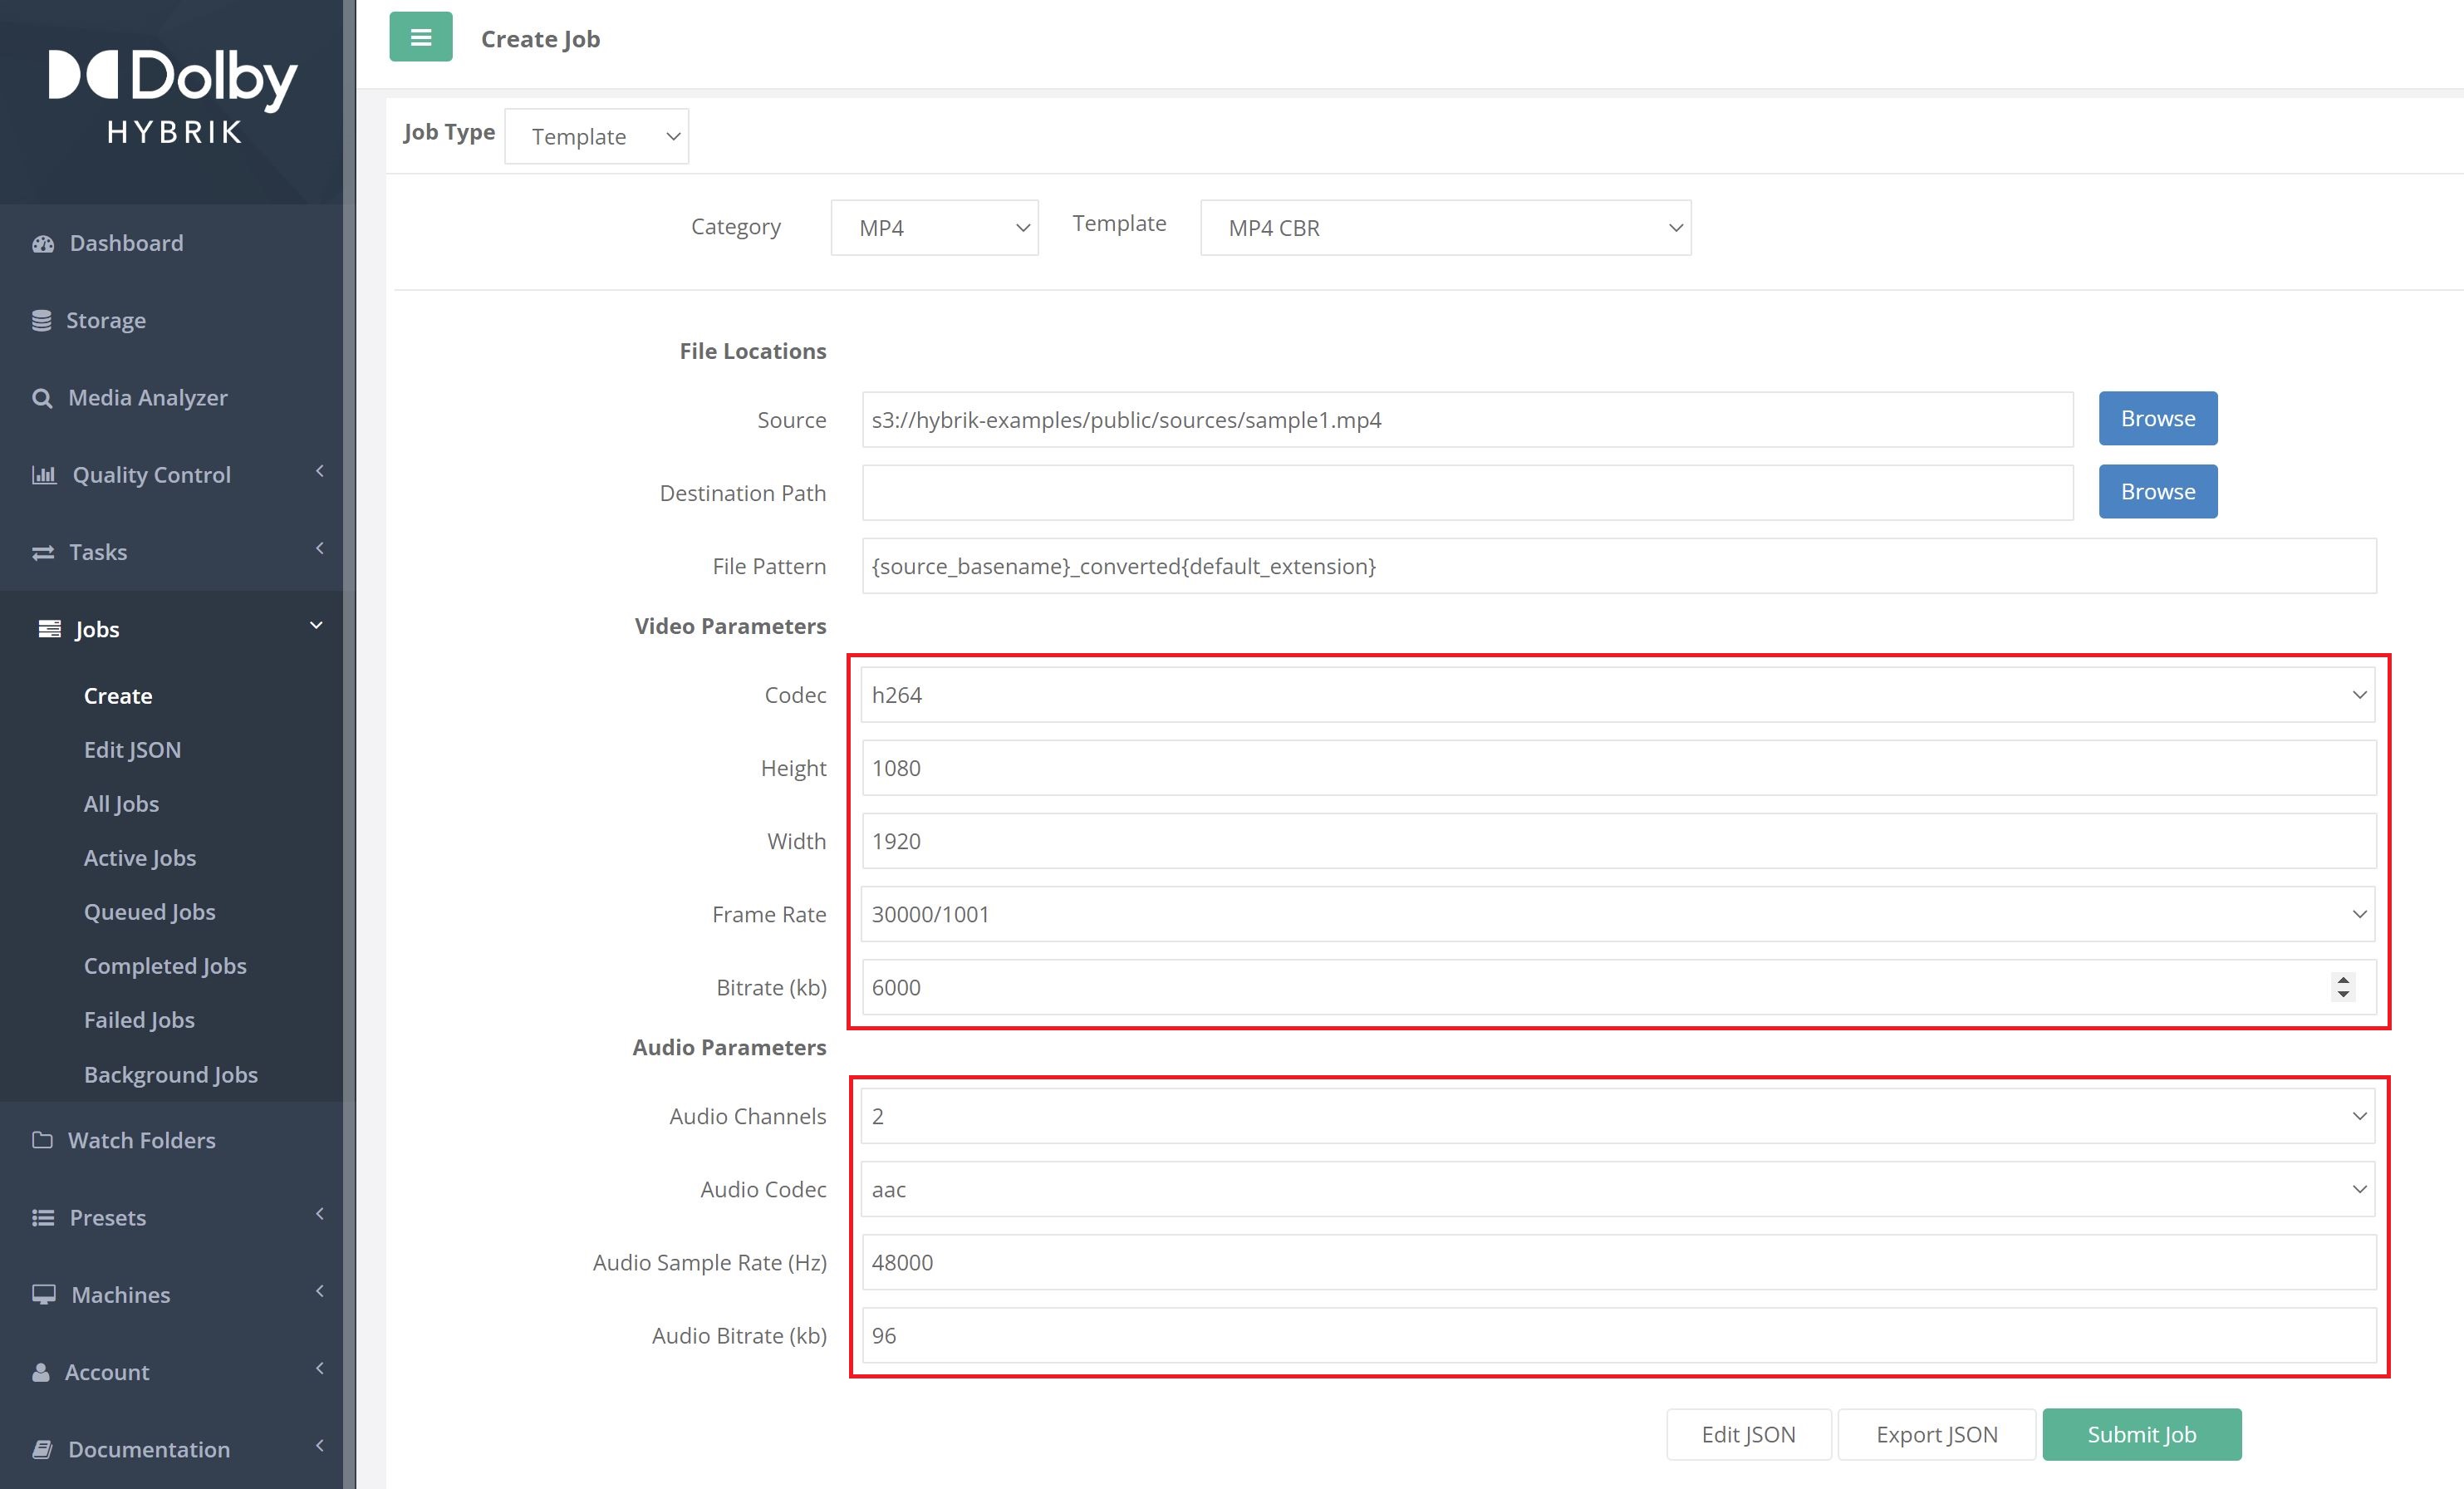
Next you can adjust the Video & Audio Parameters to your requirements by modifying the available fields.
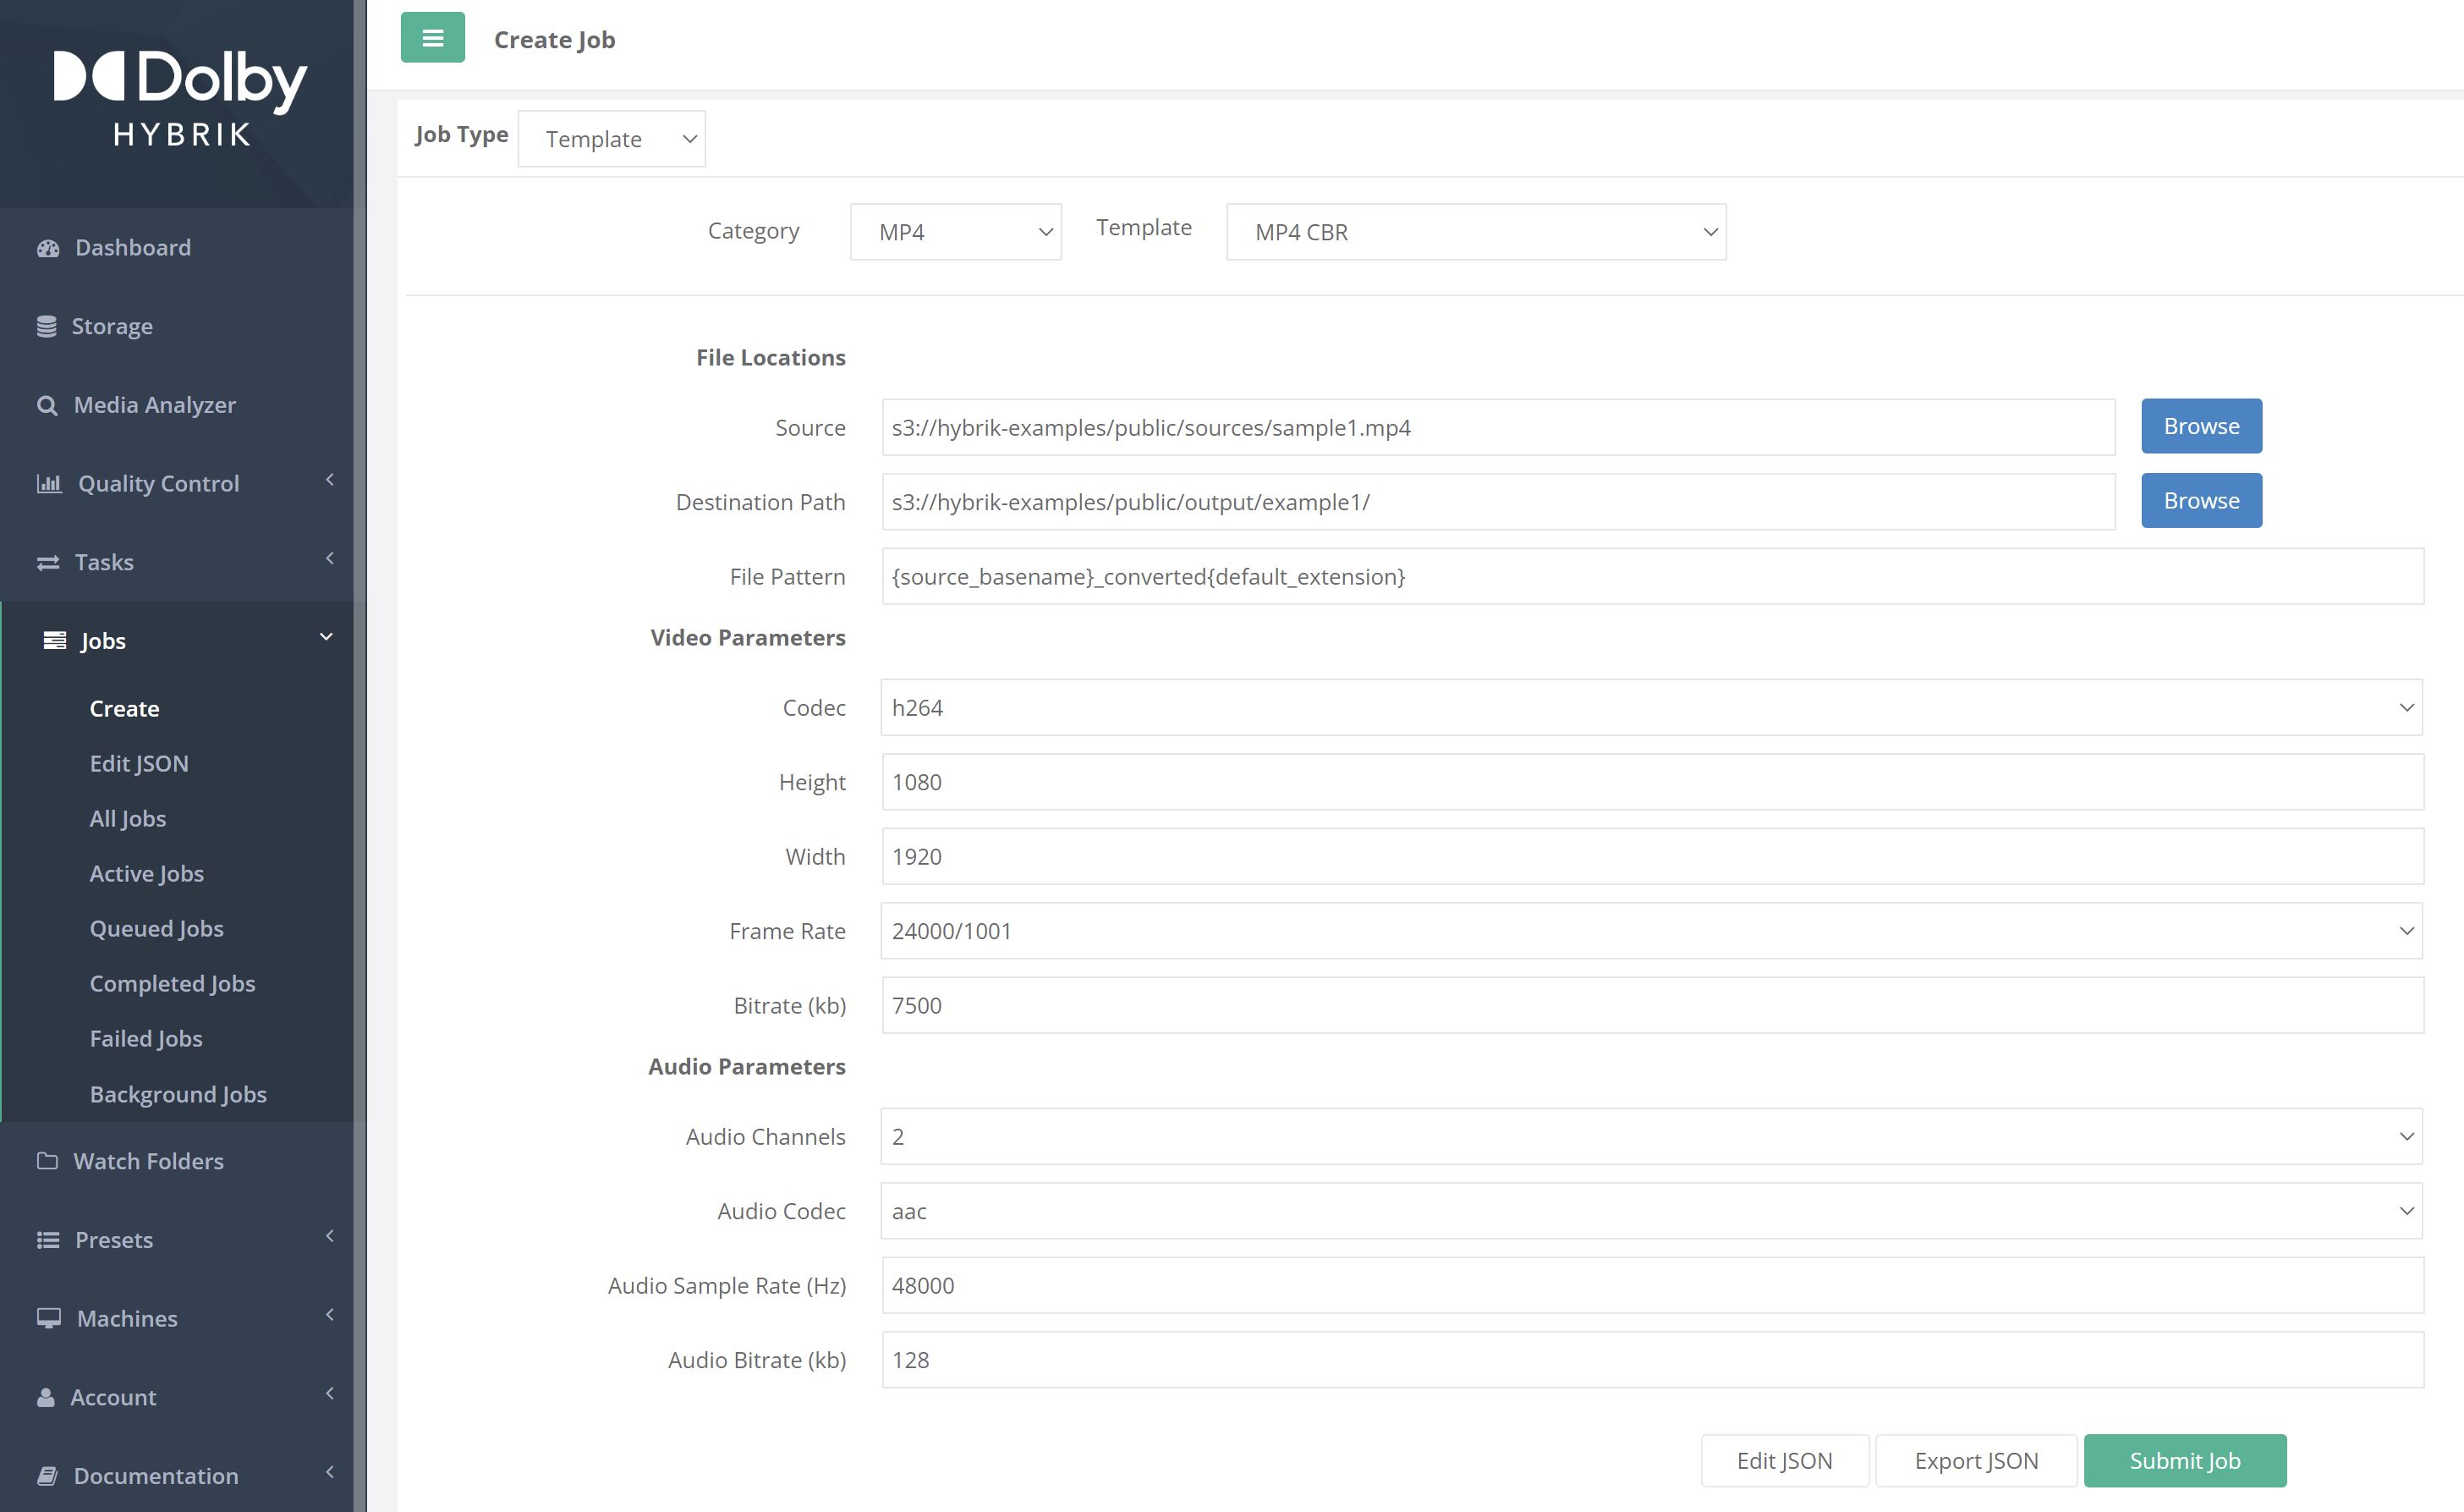
Next, choose the Destination Path (storage location) for your output file. Use the Browse button to bring up a file selector just like you did when you were selecting the source file.

Navigate into the desired folder for your output, then click the Select Folder button at the bottom of the dialog.
Finally, you can select Submit Job to submit it for processing. There are also the choices of Edit JSON and Export JSON. If you choose Edit JSON you will be presented with Hybrik's JSON editor which will allow you to hand-modify your job JSON. If you choose Export JSON, the JSON file will be downloaded to your local computer for later submission or editing. After submitting the job, you can go to the Active Jobs or the All Jobs page to view your job's progress.
Editing Job JSON
As mentioned previously, all jobs in Hybrik are defined by a JSON structure. In order to get full utilization out of the Hybrik system, you will need to know how to edit JSON. This will allow you to make any change you need in your Hybrik jobs and fully customize your workflows. Please see the Hybrik JSON Tutorial for more information on the Hybrik JSON structure. Let's create and edit a sample JSON file.
Perform the steps from Creating Your Own Job above, only this time choose Edit JSON as the last step. This will present you with a JSON text editor.
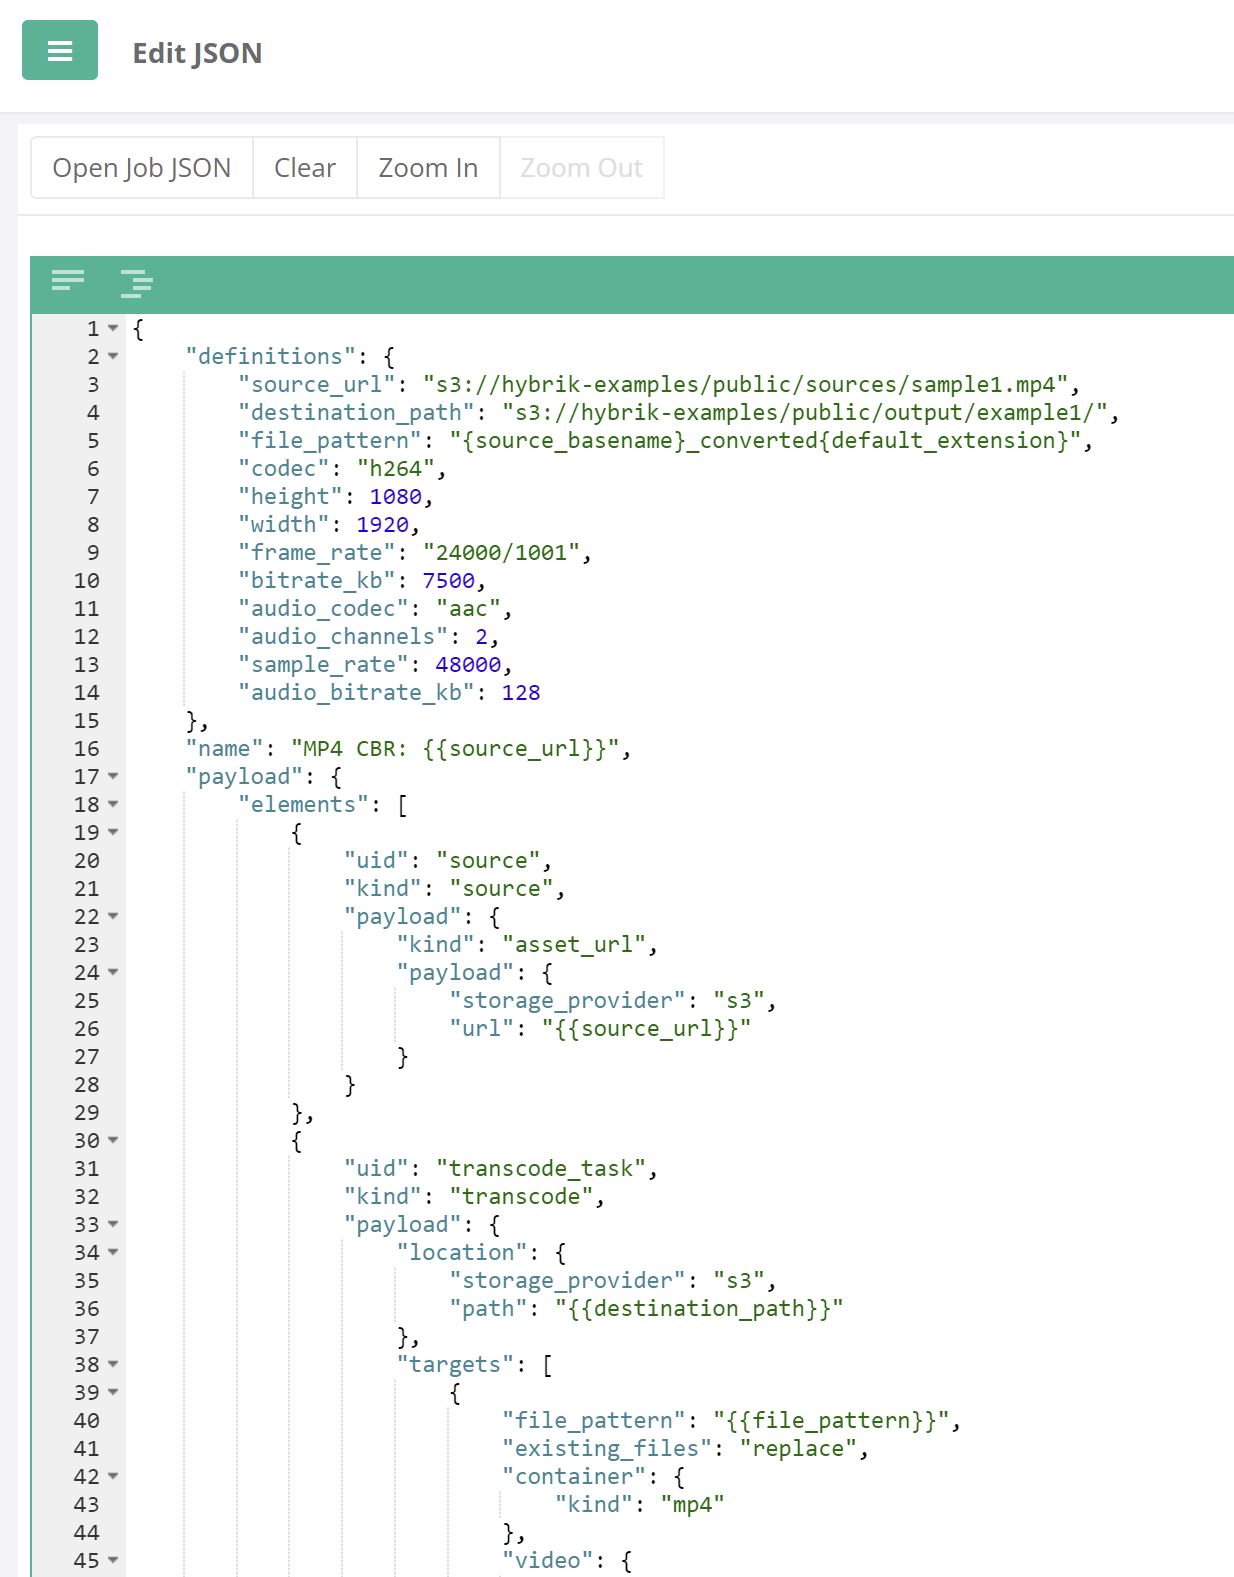
In the JSON, you'll see there are definitions present that define the height and width of the target output. Modify those values to be 720 and 1280, respectively.
Also change the bitrate_kb to a different value. Remember that it is in kilobits, so 2400 is equal to 2400 kilobits or 2.4 Mbits. Also change the job name (line 16 in the example), and then click Save Job JSON. This can be your practice file while you test out different parameters. You can submit the JSON you created either from the Job Editor or from any of the Job pages (All, Queued, Active, Completed, or Failed). You can edit your JSON files from within Hybrik or by using the text editor of your choice. We highly recommend using a JSON editor (rather than a plain text editor), since it gives you many tools to help you during the editing process. This will help with producing correctly formatted JSON.